Showing posts with label DeColourant. Show all posts

Sunday, August 29, 2021

Quilt Camp Day 4

Day 4 of quilt camp - it was a cool, cloudy day so not the best for sun printing.  We did some more shibori/indigo dye of the pieces prepared yesterday, and washed out some other dyed pieces.  Below are: left, Sue's pieces after one dip in the indigo pot; top right, Elizabeth dipping one of her pieces; bottom right, pieces awaiting a second dip in the pot.

Below, Sue's pieces after rinsing.  Top left is a rust dyed piece (not from the indigo pot); the other 3 photos show the pieces she dyed today.  The 2 stripey ones were wrapped around poles.  The one with the light background was a triangle fold with plexiglass circles clamped over the corners.  The one with the light blue circles were made with buttons that were rubber banded into the cloth - the rubber bands served as a resist to create the circles.


Elizabeth decided to experiment in the indigo pot with some fabrics which were less than successful from other dye projects and see if they could be improved upon.  Here are some as she unwrapped them.  The pink and mottled green were clamped with wooden blocks and the lime green was folded like a flag.


Below is the bottom piece of fabric (from above-the one with the circles) on the right side after unfolding and the remainder of the "less than successful fabric" is what it looked like before the indigo pot.  

She also overdyed a piece of rusted fabric with the spiderweb pattern and is quite happy with the results.


This set of pictures shows Sue's dyed/washed fabrics.  Top left is spring green; before dyeing, the fabric was printed with a birch bark Thermofax screen using Color Magnet which is a dye attractant, creating the textured pattern.  Top right is a piece dyed with a color called parakeet.  The bottom 2 are the same piece of fabric.  This was dyed with "new black".  To give it some texture, Sue used a discharge product called deColourant to remove some color through a Thermofax screen - this was also a birch bark screen, though a different one than on the green fabric.  Click on the photo for a better view.


With some new screens for playing Elizabeth decided to see what they might look like if they were screened on white fabric with Color Magnet and then dyed.  We will reveal them later in the week.


Elizabeth set out a piece of fabric prepared for Cyanotype.  As the day was cloudy, she used the wet cyanotype method and first spritzed the fabric with a solution of vinegar and water.  The white areas you see are actually the reflection of the sky and the darker areas are the shadow from a tree.  It will be interesting to see what happens after 24 hours of exposure.


Wednesday, August 12, 2020

Quilt Camp Week 5 - Take It Away!

We all (or most of us!) love color, don't we?  But sometimes we want to take color away - to create interest or contrast or the illusion of shadows.  Or just because it's a fun technique.  The process of doing this is called DISCHARGE, and it can be done with various products.  We have selected 3 products to illustrate using this process with Thermofax screens. 

But wait - there are more than 3 products in that picture!  Let me explain.  DeColourant by Jacquard is a product formulated for discharge and can be used right out of the container.  It's consistency is perfect for using with Thermofax screens.  It involves a 2-step process - applying the product and allowing it to dry (it can still be damp), then applying heat and steam with an iron to activate the color removal.  the longer you steam it, the more color comes out.  You can stop at any point when you are happy with the color change.  The one drawback to this product is the odor - it does need to be used in a well-ventilated space.

Bleach gel also works well to discharge, however this product is rather thin for use with a screen.  To solve that problem, it can be thickened with sodium alginate which you see in the packet on the left.  This is the same product used to make thickened dye, so if you do any dye printing, you may have some on hand. Just sprinkle a bit into the gel and stir to thicken; add a little bit at a time until you have the right consistency.  Because this is a bleach product, you need to drop your fabric in an anti-chlor solution to stop the color change. (That is the product on the right in the back, from ProChem.)  If you don't stop the action of the bleach, it will continue to eat away at the fibers and may result in holes.

The 3rd product is a bleach pen.  If, instead of discharging through screens, you want to draw patterns on fabric, this is a good choice. But you could also use it with screens if you don't have any other products; just use it to apply the bleach to the screen and then spread it with a squeegee, or be selective about the parts of the screen you use it on.  The pen has a "fine" tip and a brush tip.  The word "fine" is in quotes because "fine" is relative.  Don't expect thin lines.  As with the bleach gel, this product needs to be neutralized with the anti-chlor.

Though we didn't use it in this activity, Cascade dishwasher detergent is another product that contains bleach that can be used for discharge.  Sources for products are linked above.  The bleach gel and pen are from the local grocery store.

Now that you have some background on products, let's see what results they produce.  First, apply the product through the Thermofax screen just the same as you do for paint and other products.
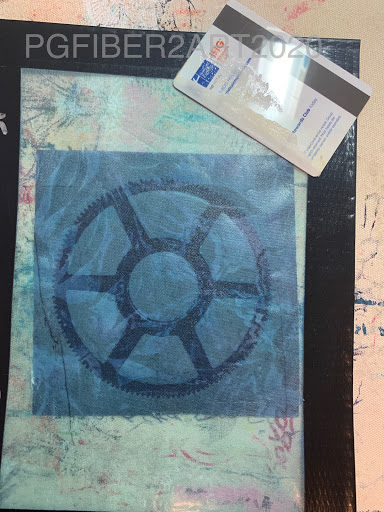
This gear screen was used with the bleach gel.
These are 2 batiks that were discharged.  The fun part of this technique is that you never know exactly what you're going to get.  Some fabric dyes discharge better than others.  Some turn unexpected colors. Blacks from different manufacturers may give you totally different results.  Different products may give different results - you'll see that in the photo below.
This piece shows the bleach gel gear discharge at the top.  The bottom is a boiler wheel screen done with deColourant.  What different color results!  We purposely kept these prints together so you could see they're on the same piece of fabric.  Again, you never know what results you will get.
Here are 2 more examples of the boiler wheel on batiks.  Noticeably the red provides a much sharper print. After those 2 products it was time to play with the bleach pen.  Each of the following pictures shows the pen applied on the left, and the rinsed, dry print on the right. (Note: these are doodle designs rather than Thermofax screens.)
Unlike the deColourant, the bleach products will effect the change within minutes.  Just keep your eye on it and when you are satisfied with the color change, drop it in the anti-chlor solution.
The circles were done with the fine tip of the bleach pen, the lines were done with the brush tip.
The x's above and spirals below were to show how colors besides black discharge. Again, it depends a lot on the dye used in the fabric.
So, what will you discharge?  If you try this technique, we'd love to see pictures of your results.  Share in the comments here or on our Facebook page.  Just be sure to work in a well - ventilated area, especially when ironing the discharge.  Sue found that working next to a screen door with a fan blowing out helped dispel the aroma. And be sure to have some anti-chlor on hand to stop the bleach action of the other products.  That being said, have fun!

One final picture, you may be wondering how to apply this technique to your art quilts, so here's an example.

The leaves here were discharged with deColourant after the background was sewn together.

Monday, February 20, 2017

Sheers and Discharge

Several students in our latest Basic Screen Printing class at Artistic Artifacts tried a variety of fabrics on which to print.  There aren't any special techniques for printing on sheers - the process is the same as for cottons.  Though it may be helpful to tape the edges of the sheer to keep it from shifting.  You could also try printing several layers at once since the sheerness will allow some paint to flow through to lower layers. Here are a few done on organza and another semi-sheer fabric.

Thermofax printing works well in conjunction with mixed media techniques and can also be done on paper, cardboard, wood, etc.  Any surface that has a bit of absorbency for the paint, so a non-glossy surface.  Highly textured surfaces may not produce a clear crisp image but there are times when that may not be the desired result anyway.  Experimenting to find out what works and what does not work is part of the fun.  A mixed media artist in the classroom was already combining screens on the fabric to create a background for future work.
DeColourant, a discharge product which was discontinued last May, was used on this green piece to discharge or take away the green leaving a lighter image of these pine branches and Queen Anne's lace. 
Jacquard has replaced and renamed their original discharge product deColourant; it can be purchased at Dharma Trading Company and Pro Chemical and Dye.

Tuesday, April 28, 2015

New in the Shop

We are working on adding some new screens to the Etsy shop.  There are 3 new so far, with a spring theme in mind.  We've got an apple blossom, a dogwood blossom, and some water ripples that are great for background texture.
The apple blossom is available in 3 sizes which can be purchased individually, or as a set at a savings over the individual screens.
 The dogwood is the state flower of Virginia, so adding this to our collection is long overdue.
This image of water ripples is great for adding a subtle overall background texture, especially in a color that is not a high contrast to the fabric.  Below are some photos of how the screens look when printed.
Both the apple and dogwood blossoms are printed in white (even though the dogwood looks pale pink in this photo).
In the image below, the water screen was printed twice with discharge.  The first time was with a wedgewood blue color, which was hard to see.  The second time was with a plain discharge, so it was just taking color out, not replacing it with another color.  That provided a more visible texture.  If you're not familiar with discharge, it is a process for taking color out of fabric.  It can be done with bleach or products containing bleach, but does require something to stop the bleaching process, such as Anti-Chlor.  For this piece, I used deColourant discharge paste - it is made in plain and colored versions.  I like this product because it has a less offensive odor (more citrusy) and doesn't require the stop-action product.  It does require heat (ironing) to complete the discharge process.
If you're looking for something new to print, check out the designs available in the shop.

Thursday, March 5, 2015

Passion Play - Screen Printing

Sue recently finished a 12 inch square quilt for an art bee challenge. The theme was "What is your passion?  She decided to focus on surface design, particularly screen printing, as her passion, and called it "Passion Play". All the pieces were pulled from her stash, and only one was a commercial fabric.
We shared this on Facebook, and asked the question - which of these pieces is the commercial fabric?  So far there are 2 incorrect guesses. So we thought it would be interesting to share the various pieces in the collage, and the steps they went through to arrive at the finished product.

One guess was the piece on the right with the text on it. This piece was hand-dyed and printed.  It was first dyed green, but wasn't very inspiring.  So last summer it got new life  by being over-dyed with a teal color and color magnet.  You can still see some of the original green in the photo below.  The pattern was created by screen printing with a product called Color Magnet by Jacquard; after printing, it is allowed to dry.  During dyeing, more dye is attracted to the color magnet creating a tone-on-tone effect. 
A strip of this was added to the collage, as it is in the picture above.  Sue decided it was too dark for the other pieces in the collage, so she decided to alter it by screen printing with a discharge product called DeColourant which takes color out.  The color a fabric discharges to can be a surprise, because it depends on what colors are in the dye.  She did a test on a scrap of the fabric and, satisfied with the color results, went ahead with discharging the piece in the collage.
This is the thermofax screen she used for the text - a definition of the word "art", which is available in the Etsy shop here.  Using the discharge to change the color toned it down enough to work better with the other fabrics in the collage.
And there you have the process for how this piece of fabric came to be.


Sunday, October 26, 2014

Printing Class at Artistic Artifacts

We've missed a couple of days of posting because yesterday was spent teaching Thermofax printing at Artistic Artifacts, and Friday was spent preparing/packing supplies.  Even though the shop is local, we provide most of the supplies needed; it is a "wet" technique so there is a bunch of stuff to transport, which takes time away from other things.  We had a lively group of 7 creative women who were new to this printing technique and did a fabulous job!  Some printed exclusively on fabric, a few tried paper, and a couple brought along some t-shirts or sweatshirts for printing.  So they really "ran" with what they learned.  It was a great day.


Here are a few of their printed pieces.


Some worked on fabric that already had other surface design techniques, such as gelatin plate printing - a perfect background.  One student used a discharge product (colorless DeColourant) with a screen on a t-shirt to remove color, which leaves the fabric with a softer hand than printing with paint.  When the product is applied, it appears wet; after drying, heat is applied with an iron which completes the discharge process and color removal - the longer you apply heat with an iron, the more color change you get.  Didn't she do a great job?