Wednesday, August 30, 2017

Free Wheeling Single Girl

At the recent VCQ meeting, Sue was in Lee Taylor's workshop using the Free Wheeling Single Girl pattern by Denyse Schmidt
This is a fun project and she is looking forward to getting back to it and completing some more blocks.  There are some templates to trace onto freezer paper before you get started sewing, but once the sewing starts, the fun begins!  The arcs are pieced from wedges of scraps and then trimmed down to the template size. 
Then the center and outside background pieces are stitched to the arcs.
Four quarter arcs make up each block which finishes at about 22".  There is excess built into the pattern, so the finished size can vary - just make sure all your finished blocks end up the same!
This was one of Lee's sample quilts, using a mixture of neutral backgrounds.
Another sample uses a gray background.  You could also go with a dark background and lighter arcs, as in this block by Cathy Tyler of Richmond.
Cathy's background is a print of Paris, which can be seen better in the photo below.
Pat's block, below, uses a blue background.
As you can see, this block offers lots of options, and we bet you can't make just one!

August VCQ Meeting

We've written many times about our state quilt guild, Virginia Consortium of Quilters, which meets 4 times a year in various locations around the state.  For those new to our blog, our one-day meetings consist of a workshop (usually 3-4 choices), a box lunch, and a business meeting.  One of the workshop options is always Come Quilt with Me, where you choose to work on a previously started project rather than start something new.  It's always a fun day of quilting and fellowship with fellow quilters from all over Virginia.  Our August meeting was held in Newport News and we had a great turn out of 80+.  It was also the opening of registration for our biannual retreat, Celebration, which takes place next April 26-29 at Smith Mountain Lake 4-H Center.  Here are some pictures from show and tell at the end of the day.
Pretty Leaves, Punkin' was a fusible applique class taught by Joy Duke.
Lee Taylor of SewLoveLee in White Stone, VA, taught Free Wheeling Single Girl, a pattern by Denyse Schmidt.  The above photo shows examples of a finished block.
A third class was Improv Piecing and Quilting taught by Mary Menzer.   This group got their quilts pieced and partially quilted. 
Meryl Ann Butler taught Secrets of Color for Quilters which focused on value and hue.

Following class show and tell, members were able to share other projects they brought.  Unfortunately I don't have everyone's name.
Sue Burton shares a quilt top that she completed.
Karan Fisher made the quilt above.
If I remember correctly these were paper pieced blocks.
Above is one a number of charity quilts that were started at the May meeting and turned in in August.  These are going to the ALS Hopes and Dreams quilt project.
Here's a great example of improv piecing.
Terry Hanson made the quilt above, which I think was a block(s) of the month project.
This quilt was made by Laura Beard.

Our next meeting takes place November 11 in Manassas.  The newsletter with details on location, workshops, and registration will be out in September.  It will be published on the website when it is available.  Come join us! 

Monday, August 28, 2017

New Screens in the Etsy Shop

Well, it's been 3 weeks since our last blog post!  Where does the time go?  After driving home from NH, Sue went to the weekend VCQ meeting in Newport News, VA, and then a few days later went to PA to spend a week with her mother.  After being home for a week and getting caught up on things, it is time to go again for a few more days.  And Elizabeth wrapped up her time in NH, driving home in time to return to work last week, with the new school year starting today.  She says she can't wait to retire, but it's still hard to keep up with things even in retirement!

One thing we neglected to blog about during quilt camp was that we added some new screens to the Etsy shop.  Actually, the screens themselves aren't new, but the shape is.  We took some of our existing screens and cropped them into circular shapes.  (You're not seeing the complete circles here because of how they fit on the Etsy page.)


There is one more not shown here, which is the chain link image.  The crackles, tree bark, water ripples and birds are all 5 inch diameter circles.  The ricing is about 4 inch diameter and the chain link is 3.5 inches. 

What might you do with these?   As with any of our screens, create a pattern, use the textures as a background for another image, or create the look of a circle in a square without piecing or stitching!  Sue especially likes the look of the birds in a tree against one of the other textures as a background.
The photo above shows some test prints stitched into a 9 patch that could be the start of a quilt or something smaller like a pillow.  While these were done on solids, they can just as well be used on commercial prints and batiks.  The examples below are done with discharge paste which takes color out of the fabric.


Enlarge the bottom photo to see how the pattern in the fabric still shows through the discharge.

What ideas do you have for using these screens?  We'd love to hear from you!


Monday, August 7, 2017

Quilt Camp Day 10

We promised to do something different today and we did!  It was Sue's last day at quilt camp so we tried to squeeze in as much as we could.  Of course, just when we get in the groove, one has to leave.  We watched several episodes of a Quilting Arts DVD over the past few days and one episode featured Julie Booth and her process for using liquid dish detergent as a resist.  We know Julie because she also teaches at Artistic Artifacts, and knew about this technique from her book, Fabric Printing at Home, but had not tried it yet.  (Yes, we're a little behind.  Julie's book has been out a couple of years and the DVD is series 1700 from 2015.)  At any rate, we had fun playing with this resist. 
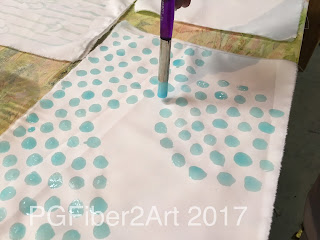
The first step involves mark making with the dish soap.  Here Elizabeth is using a stiff brush to make dots.  After the soap dries (about 30 minutes), the next step is a wash of diluted transparent paint.  Julie used black in her demo; Sue used peacock and Elizabeth used navy blue.
After the paint dries, you heat set the paint, then rinse out the dish soap.  Of course, if you want your design in white, you could stop at this point.  After letting the pieces dry again, the next step is adding color with diluted textile paint.  At this point, it's kind of like water color, letting the colors blend where they overlap.
These are our pieces drying on the line.  And close ups below.
Sue's pieces above.  Elizabeth's pieces below.
It was fun to experiment and we learned some things we would do differently next time.  More details in a future post.

Sue also did a bit of thermofax printing.
Our puff ball screen is a little tricky - very easy to get too much paint.
On this piece, half is the puff ball and the other half is ginkgo leaves.  (The intent was to cut in two.)
And this one uses the mum screen in 2 sizes.   This is our favorite of the 3 prints.  And just in case you're missing indigo, here's one more that Elizabeth did, a pillow cover (purchased as a blank.)
Sue will be traveling on Tuesday, so it will be up to Elizabeth to share more tomorrow!

More Indigo

We hope you're not totally tired of indigo and shibori posts yet.  Just one more day of indigo results, then we'll move on to other things - at least that's the plan!
We watched a video by Charlotte Scott that showed more ways to fold, wrap and tie the fabric.  Above are 2 of Elizabeth's pieces, on the left was rolled up like a sushi roll; on the right was folded in half and then loosely formed into a bull's eye and tied with string or rubber bands.
Becky's scarf is done with a variety of items - the wiffle golf balls, floral marbles, 3-d small triangles.  Because it was folded in half, you can see the different results between what was on the inside and what was on the outside.
Molly was resurrected from the loft to display Elizabeth's t-shirt, done with accordion folds and rubber bands.
These are the 4 pieces Sue did yesterday; top is the bull's eye, then a stitched circle piece, the small one is the sushi roll, and the bottom left is spider webs.
And the results, left to right: sushi, spider webs, bull's eye, and stitched circles.  Enlarge the photo to see better detail.
And to prove that we have done other things, Sue started these 2 earlier in the week, trying to get something useful for a desert background.  The piece on the right is bronze, the one of the left started with mocha, and then she added yellow.  Mistake!  Should have left well enough alone, also should have used a different container.  Oh well, lessons learned and it can always be over dyed!

Sunday, August 6, 2017

Indigo Round 2

On Saturday we dipped some more prepared pieces in the indigo dye pot, trying different folding, tying and resist techniques.  We also thought we'd show what the "bloom" or "flower" looks like that forms on the top of the pot.  When you want to use the indigo, you first remove the bloom and set it aside, then replace it when you are finished.  As long as the bloom lasts on top of the pot, your dye is still active.  If it disappears, the pot will need to be refreshed.  You can read more about maintaining an indigo pot at the ProChem or Dharma websites.
Sue used some acrylic shapes that were clamped to the folded fabric to create a resist.  In this photo you can see the fabric still oxidizing from green to blue.
Here's the piece after washing and drying.  The shapes came out really crisp.
Elizabeth did this piece which was accordion folded, first in one direction, then the other so it was a small square and held it together with rubber bands.
This one was folded in half (see the dark line down the middle?), then accordion folded and banded.
This was a standard flag fold (triangles).
Sue decided to use the zigzag stitching technique on a t-shirt.
And a few more pieces are hanging on the line today!

Saturday, August 5, 2017

Shibori and Indigo Dye Day

Friday we experimented some with our indigo pot by refreshing it with new soda ash, thiox and pre-reduced indigo.  When traveling to Lowell on Thursday, Elizabeth's sister drove which allowed us to both stitch some pimatex cotton fat quarters with gathering stitches so the thread could be drawn up allowing the folds to create interesting patterns and textures.  Elizabeth stitched half circles about half an inch apart on the folded edge of her piece of fabric. Here it is all drawn up.
And here it is after dyeing.  Since our indigo pot was fresh we dipped only once to get this amount of blue.
Sue stitched her piece in zigzag rows.  Here's the partially stitched piece.
The next photo shows it gathered up before dyeing, and the finished piece after dyeing.
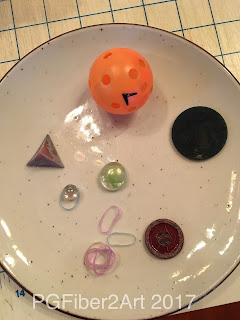
Other items we tried out for creating our fabrics included wiffle golf balls, small marbles, flat marbles (like the ones used in flower arranging), some small plastic 3D triangles, small flat wooden discs and buttons.  Most items are held in the fabric with assorted sizes of rubber bands.  For the tiny items we used small "ouch-less" hair bands bought at the Dollar Store in packs of 500!
Indigo is interesting to use because as you remove it from the dye bath you can watch the blue color (think blue jeans) develop from the bright lime that it is when you first take it out of the water.          
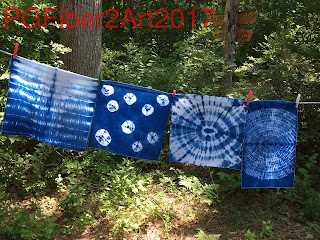
Here are some of the finished items.  Below, Sue used the wiffle golf balls for the top piece, and the bottom piece had a combination of flat wooden discs and buttons.
In the next photo, the top was accordion pleated and rubber banded, and the bottom was created with the floral marbles.           
 We did some more pieces today, so stay tuned!