Showing posts with label Thermofax printing. Show all posts

Monday, August 12, 2024

Etsy Shop Open and Discount

 Our Etsy shop is open again after a few months break due to problems with our Thermofax machine.  


Since these machines are "old technology" (think 1960s!), finding repair services is not the easiest task. Initially, the lamp that provides the flash to burn the screens stopped working so a replacement lamp was needed.  The first challenge was finding the correct replacement and installing it.  That took some time.  The installation was also a challenge, and after installing the new lamp and putting things back together, it ran but no flash.  All this took several weeks.  


Then the task became finding someone who might be able to fix it.  After some internet searching and inquiries to various online groups who might have resources, we contacted a repair service in Florida. After some messaging it was determined that it would be necessary to send the machine off for repair.  A few weeks later it has returned and we were able to open the Etsy shop again.  

To thank our customers for their patience, we are offering a 10% discount through the month of August on everything in the Etsy shop.  Use code SAVE10 at checkout for the discount.  We also added 3 new screens shown below.  Visit the shop for photos of prints of these screens which include a bird seen from above, wisteria, and a tickseed (coreopsis) flower in 3 sizes.  


We also are happy to make your custom screens and hope you will visit the shop soon!


Tuesday, May 28, 2024

Paint on Fabric with Kevin Womack

 Sue's first day class was Improv Paining on Fabric with Kevin Womack.  This was a "play day" to transform fabric with various surface design techniques.  We had various items like old kitchen utensils that could be used to create designs, stencils, bubble wrap and other items to create texture, objects that could be placed under the fabric and painted over for design & texture.  We also used color washes of diluted paint to transform a background.  Most students worked on white "new" fabric, but Sue used pieces that were previously dyed.  These were mostly pieces that didn't turn out well - too much white and/or blah colors, so this class was an attempt to make them more interesting.

work space

Image printed with a thermofax screen

Designs added with various mark making objects, a light blue wash colored in white areas

Design printed with a thermofax screen; original design is from a spiral masher/mixer (kitchen utensil)

 
This texture is from a length of cording placed under the fabric, and then flicking the paint brush over the raised area

Paint over a stencil created these images

It is fun and freeing to work improvisationally without thinking too much about what you are doing - just create!

Monday, October 23, 2023

Custom Screens

One of the services we provide is making custom screens from images that our customers provide, and we love to see images of what they do with the screens.  They can be from original drawings or photos, or any image that you have a license to use or is in the public domain.  One of our current customers, Lois Gaylord, has given permission for us to share some of her work for which we made Thermofax screens. 

Lois actually has 2 Etsy shops that you can visit for more pictures of her work, one is Lois Gaylord - Weaving Oneness through Spiritual Art and Textiles; the other is Weaving Oneness.  The first shop features textiles celebrating Jewish life.  The second shop features items of a spiritual nature.

Below are some photos of items that we made the screens for.


It looks to us like the screens worked well and that Lois does lovely work.  Please visit her Etsy shops to see more of her work.

What images do you have that could be made into custom screens?

Monday, June 19, 2023

Thermofax Screen Printing Tips

Previously posted in July 2020, worth repeating as a reminder of best practices.

We frequently get various questions about printing from customers in our Etsy shop.  Though we have FAQs on Etsy and this blog, people don't always read them.  So we thought it might be helpful to do a post of our printing tips.  There are always variables when printing, so we recommend doing test prints before starting on your project.  That way you can work out any issues without ruining the project.

First things first:
TAPE YOUR SCREEN if you did not order a pre-taped screen. See the tutorial on our blog at http://pgfiber2art.blogspot.com/p/blog-page_10.html
Find a how to print tutorial at http://pgfiber2art.blogspot.com/2014/10/how-to-print-with-thermofax-screens.html


Printing Tips:

  • Thermofax printing works best on a padded surface.  On a flat surface, we use a piece of craft felt topped with a piece of canvas fabric or muslin.  The fabric serves to absorb excess paint.  (top picture below) For t-shirts, other garments, or tote bags place a piece of cardboard covered in waste fabric inside to provide cushioning and prevent paint transfer if it bleeds through; change fabric as needed; or just use a couple of layers of craft felt.  (bottom picture below)

  • If you are printing on fabrics, use paints formulated for textiles.  These paints will give your finished product a softer “hand”. Some types of paint we use include: Fluid Textile Paint (artisticartifacts.com), ProChem (prochemicalanddye.com), Speedball Fabric Printing Inks, Jacquard paints, Versatex paints (DharmaTrading.com). You can also find paint at DickBlick.com and jerrysartarama.com. 

  • Different paints have different viscosity; some sink into the fabric more than others. In the photo below, the white paint was thinner and sank in more and gave a raised effect to the lettering.  The blue paint was thicker and stayed on the surface keeping it flatter.
     
  • If printing on paper, you can use acrylic craft paints. Speedball makes both textile and non-textile inks (paints). Look for the “fabric” designation when printing textiles. 
  • DO A TEST PRINT.  Before tackling your project, do a test print so you know how many passes you need, how much pressure with the squeegee, and can see any spots that may need a bit more attention or may not print clearly.  Often the screen needs to be “primed” and will print better on the 2nd or 3rd print.  Below, the top picture shows the print after one pass with the squeegee. The bottom shows the same print after about 4 passes.  Keep lifting edges of the screen to check the print before removing the screen.
  • Squeegees come in all types and sizes.  While a general rule of thumb is to match the size of the squeegee to the size of the print, you may not get even pressure with a large squeegee.  Our favorite squeegees to use are old credit cards and hotel keys. There are also scrapers that come in sets of 3 sizes that you can find in auto supply stores (used for detailing) or big box home stores in the paint department. If you want something larger you can find them at the art supply websites. When printing, hold the squeegee at a 90 degree angle and pull across the screen towards yourself.
  • We do not usually secure the screen to the surface we are printing on, but if you need to, blue painters tape works well for that.  Otherwise, hold the taped edges of the screen securely while printing.
  •  IMPORTANT! Before removing the screen, pick up the edges and check the print to see if you need to go over any area again.  You can carefully move your hand holding the screen to different spots to check so that the screen does not shift.  Or use tape to hold the screen in place. As stated previously, one pass across the screen is seldom enough.
  • Put a line of paint across the top of the screen and pull the paint toward you.  Moving the squeegee in different directions means you are likely to shift the screen and end up with a shadow print. It is Ok to put more paint in denser areas. You are pulling the paint all the way across the screen so it may take more than you think. Dense/solid areas will require more paint and passes of the squeegee.  A smaller squeegee means you can target specific areas more easily.
  •  Heat set (iron) the print when dry.


Clean Up:


·        As soon as you finish with a screen, drop it into a pan of room temperature water to prevent paint from drying on the screen. Paints labeled "pearlescent" that contain mica will clog a screen more quickly than those without and will need to be cleaned sooner.
·        Use an old toothbrush or fingernail brush to gently clean the screen; some paints may leave a slight stain.
·        Pat the screen dry with an old bath towel and allow to dry completely before storing.  Screens put away damp may stick to each other and cause the plastic emulsion to peel off.

We hope these tips will lead to more successful printing!

Monday, June 12, 2023

Fusible Applique Process

This is a re-post of a blog post from September 2020 on the fusible applique process we use with Thermofax printing.  This is the same process described in the "Thermofax Printing for Fusible Applique" article published in the summer 2023 issue of Quilting Arts magazine.  The issue is currently available digitally online and on newsstand June 13.  We have a number of screen designs suitable for this process available in our Etsy shop.  Feel free to contact us with any questions. (pgfiber2art@gmail.com)


Another technique we have used Thermofax screen printing for is to create raw edge fusible appliques.  Back in May, Sue shared a project where she used the "lazy daisy" screen in 3 sizes to make appliques. They were printed with black acrylic paint on yellow fabric.

After printing and heat setting, they need to be backed with a fusible product before cutting out.  Sue used MistyFuse, but you could also use Wonder Under or Steam-a-Seam2 Lite, or another favorite fusible, as long as it is fairly thin.  You don't want to add stiffness or something that might gum up on your needle when stitching. After fusing, cut them out, then you are ready to create your arrangement on the background.  Play with the arrangement until you are satisfied.  Consideration was also given to where the stems and leaves would go and what needed to go underneath what. Above right is the arrangement with stems and leaves added.  The stems & leaves were fused and stitched before the flowers were fused in place. To maintain your arrangement, take a picture for reference and you can also lay them out on another surface the same way you want them on the quilt.


The flowers were all edge stitched in black along the printing lines, and the petals have some accent stitching in yellow.  

Elizabeth made her applique sample using a zebra screen and made it into a postcard.
She cut her postcard base (fusible Timtex or Peltex can be used) to the standard 4 x 6" size and printed the zebras on a yellow fabric.  Then she fused Heat 'n Bond to the back before cutting them out.
Above shows the cut out zebra and positioning it against the background of grasses printed on the fabric to be used.
Finished postcard above.


Here are some other examples of applique projects.
Butterfly postcards - printed butterflies, cut out after fusible applied, finished postcards.

Falling leaves - pin oak leaf appliques, before and after applied to quilt.

The birds were printed on a color catcher (colored by putting in with a wash load of dyed fabric); different colors were tested to see what looked best on the piece on the right.  Color catchers are great for this technique because they are non-woven and won't fray on the edges. 

We have a number of screens in the shop that work well for this fusible applique technique, including various flowers, leaves, bird, butterflies. If you have a photo of an item, you can turn it into a screen - all of those items mentioned started out as photos we took. And like the flowers, when they are digital, you can create various sizes.  What photos do you have that would make great appliques?

Monday, June 5, 2023

Published!


One of Sue's bucket list items was to publish an article in Quilting Arts magazine, and she accomplished that goal with the summer 2023 issue of Quilting Arts, available now in digital format or on newsstands June 13.  Subscription copies will arrive in mailboxes by the 13th.  The article illustrates her process for using Thermofax prints to create fusible appliques.  While the idea for this article floated around in her head for a while, when finally submitted, she was pleasantly surprised to find it quickly accepted.

Without giving too much away (pick up a copy of the magazine!), it features the coneflower quilt below.  This full-size photo of the quilt does not actually appear in the issue - just smaller, partial images and step-outs.  


The issue also features a cover contest.  There were 161 entries for the contest which were winnowed down to 7 finalists before choosing Kate Themel's "As You Set Out" quilt below.

There are intriguing articles in this issue - can't wait to sit down with the paper copy when it arrives!  If you have any questions about the article or process, contact us at pgfiber2art@gmail.com.

Monday, May 29, 2023

Art is a Bridge

The spring issue of Quilting Arts Magazine included a Reader's Challenge to create a 10" x 5" work with horizontal orientation on the theme "Art is a Bridge".  This of course was open to any interpretation of the word "bridge" - literal or figurative.  Sue is always up for a challenge and decided to give it a try, with a specific literal interpretation in mind.  On her trip to Scotland last year, a stop in Queensferry provided a photo op for several bridges crossing the Firth of Forth, one being the Forth railroad bridge.  


This is the photo Sue took of the bridge, which is the world’s longest cantilever railway bridge.  It was built between 1882 and 1889 and restored in 2012.  The red of the bridge was a striking contrast to the blue of the sky and water.

It was fairly simple to recreate, with only a few elements - water, sky, a bit of land and the bridge itself. The challenge was to create the bridge in a way that would visually allow the background to show through the lines of the bridge.  It appeared the solution to that would need to be a Thermofax screen, but rather than printing directly on the background, printing on something sheer so that the background would show through.  


The first step was to crop down to just the bridge and convert it to black and white.  Then the background would have to be eliminated to get to an image suitable for a screen.


Once that was done, some test prints were made on a sheer fabric to make sure the concept would work.  Then constructing the small piece could begin.


The photo below shows the background elements.


After the bridge was printed on Extravorganza, some MistyFuse was applied to the back.  Then it was cut out close to the shape of the bridge and fused in place on the background.


The last step was adding the quilting and embellishment.  Some yarns were couched to create a wave-like effect on the water. A bit of pen and ink were used to darken and complete some of the lines of the bridge.


Finished piece.  Even though it didn't make the cut for those selected to be published in the magazine, we thought you would enjoy seeing it and the process in making it, particularly creating the Thermofax screen. It will serve as a fond reminder of the trip!

Wednesday, September 1, 2021

Quilt Camp Day 7

Day 7 was busy with lots of time spent washing out dyed fabrics and another round in the indigo pot.

Another ice dyed t shirt for Molly but this time the dye is on top of the ice instead of under it.  Watch for the results in a few days.  Two blends of yellow and one of red.


After refreshing our indigo bucket, we did quite a number of indigo pieces today, many of them over top of other techniques such as "not so stellar" dyed pieces and some over rust too.  It feels like a very satisfactory way to improve those dud pieces you sometimes end up with.


Along with washing out some dyed pieces and the indigo above, Sue also did  another sun print and cyanotype prints.

Molly got a new shirt with hand drawn ginkgo leaves screen printed around the hem and on the pocket.  It was ice dyed with a color called Marine.


Molly sure does like watching the sun set.


More fun things to unveil tomorrow.

Wednesday, September 30, 2020

Quilt Camp-Week 11 Sometimes your creative journey takes you in a different direction

Last week, Sue wrote about how she revived her original idea for using our new screens in a project to benefit the Virginia Quilt Museum by adding variety to her 9 patch squares.

Elizabeth also tried to make a 9 patch but took the path of a quilt-as-you-go with a leaf quilt design.  Her plan was to fuse applique her fall inspired leaves to the block after the quilting and then stitch them around the edges.  What happened?  After making a few trial blocks she decided the leaves were too small for the blocks,   Also, the leaf designs, while lovely and some of our best selling screens, are not the new thermofax screens we hoped to showcase for you.  The bark screen was the intention for the 9 patch.  


After seeing Sue's dyed fabric, Elizabeth remembered this spiral ice dyed piece and it reminded her of the fall through the skylights here in her house in New Hampshire.


Taking the spiral as a whole piece, she laid out her fused leaves in a circular pattern and then still thought, nah, this isn't working.  That happens some times when making an art quilt and we have to give ourselves permission to put it aside and go create something else.


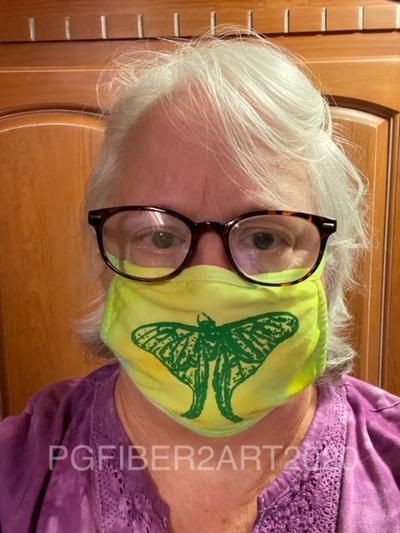
A few warm early fall days were arriving so she went back to ice dyeing some masks. Maybe she will return to the other ideas on another day?  On some lime green/yellow ice dyed combinations the new Luna Moth was printed with fabric paint.


One of our new screen options are words.  We will burn screens of your choice of words and you can use them in your fiber, paper, clay, or other surfaces that will take a paint or thickened dye.  Elizabeth made these masks using some screens she had on hand.  Wouldn't "smile" be a great one to use?  Smile is one of our new word screens.  Bloom seemed like a good choice also.


You can find the luna moth and word screens, as well as all our other designs, in our Etsy shop.  We are also happy to make custom screens from your images.  Don't forget our fall sale runs through Saturday, Oct. 3. Use code SEPT2020 at check out for a 15% discount.