Thursday, November 9, 2023

Quilt Retreat

Sue recently enjoyed a quilt retreat with her local guild in Winchester, Virginia.  Approximately 50 quilters spent 4 + days sewing on their individual projects in the conference room of the Hampton Inn.  This is the first retreat Sue has attended in over a year, so it was quite a job to gather projects, supplies, travel sewing machine, and other miscellaneous paraphernalia!  But once arrived and unpacked, it was nice to be able to sew, leave the sewing space, and go upstairs to the room whenever desired. 

The photo above is courtesy Jim Watson, the "official" photographer for the group.  Though she only worked on 2 projects, a good bit was accomplished.


First on the agenda was adding a decorative blanket stitch to the edges of the orange peel shapes on this quilt top.  Now that that task is complete, it is ready to be layered and quilted.

The other project she worked on is making more blocks for the Harrisonburg quilt.  Ten mew blocks were completed to add to the 12 done previously.  That leaves 8 more to go, for a total of 30.  The plan is to make a queen size quilt.


In addition to the 12-inch blocks, she also made 9 cornerstone blocks - the small nine-patch blocks you see in the photo above.  They will be placed where the sashing strips between blocks meet.  The center square-in-a-square portion of the block doesn't take long to stitch, but the outside section with half-square triangles is what takes the most time.

At each retreat we also make charity blocks - each participant made 2 - to be used in making quilts to donate to charity.  Another activity is making lottery blocks.  Everyone who participates receives a ticket for each block contributed.  The blocks are divided into groups and winners are drawn from the tickets.  Sue was lucky this time and won a set of 19 pumpkin blocks!


The top photo shows some of the blocks she won.  The second photo is a sample quilt made from the pattern.  Sue's plan is to make a table runner and maybe a small quilt with the blocks. 


Above is Sue's friend/roommate Kathy and one of the projects she worked on.  Again, thanks to Jim Watson for the photo.  It was good to be at retreat and see all the wonderful projects everyone worked on.

Monday, October 23, 2023

Custom Screens

One of the services we provide is making custom screens from images that our customers provide, and we love to see images of what they do with the screens.  They can be from original drawings or photos, or any image that you have a license to use or is in the public domain.  One of our current customers, Lois Gaylord, has given permission for us to share some of her work for which we made Thermofax screens. 

Lois actually has 2 Etsy shops that you can visit for more pictures of her work, one is Lois Gaylord - Weaving Oneness through Spiritual Art and Textiles; the other is Weaving Oneness.  The first shop features textiles celebrating Jewish life.  The second shop features items of a spiritual nature.

Below are some photos of items that we made the screens for.


It looks to us like the screens worked well and that Lois does lovely work.  Please visit her Etsy shops to see more of her work.

What images do you have that could be made into custom screens?

Sunday, October 1, 2023

Playing with Photos for Thermofax Screens

This is an edited version of a post from 2016. 

Have you ever considered how you might use your own photos in your art quilts or mixed media work?  There are several products available to create photo transfers.  You can also print photos on sheer fabrics like organza to create a different effect.  Some people use photos as the basis for a landscape or portrait quilt, using it to make a pattern for piecing.   At PGFiber2Art we like to use photos as the basis for Thermofax screens.  We use Photoshop Elements to turn photos into black and white images that are suitable for screens. 

This zinnia image is a good example of how many different ways an image can be manipulated for different outcomes.  Excited by the "what if", we created several variations of the same image that might be used together. 
Photoshop Elements is a powerful program and has many filters that can be applied to a black and white image.  Below is the black and white image of the flower with the background removed.
Once we have gotten an image to this point, we start applying filters from the Filters menu.  There are lots to choose from and it just takes some time playing to see what you like best, but usually we settle on one.  Each filter also has its own options that allow you to adjust things like darkness, contrast, details, etc. so the possible outcomes are many.  Just for the fun of it we decided to apply different filters to this flower to illustrate the options for students when teching this technique.  And that's when the light bulb went on and we realized that this could be a cool design element.  Here are 5 different filters applied to the flower image.
These will be made into screens in a variety of sizes, and then the fun with fabric and paint will begin.  Can you visualize how multiple variations of the one image will work together?  What images do you have that you think would make a good Thermofax screen?

Monday, September 25, 2023

Fundraising for a local landmark


A local landmark in New Hampshire near where we have our Quilt Camp, is Abenaki Tower.  In 2024 it will be a 100-year-old organization.  The current tower is the second one on the hill overlooking Lake Winnipesaukee and it is now time to fundraise for the third tower.  Nothing wooden lasts forever in the woods!  The tower is a non-profit supported by local families to Tuftonboro New Hampshire and was originally funded by small donations from bake sales, bridge nights, and other community events.  In light of helping maintain that tradition the committee is holding sales of small items and have some local artists involved in supporting the tower.  Elizabeth decided she could contribute by screening some images on cardstock and fabric and providing them as materials for the "makers" to do what they do best and make.


This is the second tower on the property and is made from telephone poles, the original tower was lumber and clapboard.  Soon an architect will come up for a design for tower number 3.


This is the logo of the organization.  It has been screened on a green hand dye and might make a great pillow front.


The center of the logo looks like it would make a nice small ornament and is currently being made into some notecards for the secretary to use as thank you notes.


The tower screened by itself on some blue and green hand dyed fabric.  What should we create with this image?


Here is one idea for an ornament.  The tower will have a decorated Christmas tree at the Festival of Trees in Wolfeboro this December.


The view of Melvin Bay from the tower is one of our favorite reasons for taking this easy 1/4 mile hike to the tower and climbing to the top.


Monday, September 18, 2023

Cyanotype in the Tropics

In December of 2021, Elizabeth, her husband and her sister went to Hawaii to attend the 80th anniversary of Pearl Harbor.  Their father was aboard the USS Downes on December 7, 1941.

She decided to take along some pretreated cyanotype fabric along with pins, foam core board, and saran wrap.  Thinking it would be fun to get some of the tropical leaves and flowers in cyanotype as she had seen some lovely examples online.

Luckily, they stayed in Waikiki next to a park where she could pick up plenty of items to try.  Unluckily the weather was not very sunny that week, the hotel balcony got a lot of shade, and there was a lot of rain.  Thus, the results were less than satisfactory.  Here are a few pictures of the set up.


Fast forward to August of this year (2023), she had the chance to return but to Kauai this time.  She was sure that the results would be so much better in the summertime.  Boy, was she wrong.  She got Covid on the second day there and so most of her time was relegated to the house and yard, limiting the choices of plant materials and not giving much time for crafting or experimenting.


After both experiences, she has decided that should she return (there is the chance to go back next May), she would need to find some pieces of glass under which to flatten her items to keep them from blowing in the wind.

Have you ever tried to craft while on a vacation?

Monday, September 4, 2023

SAQA Benefit Auction

Each fall, Studio Art Quilt Associates (SAQA) holds an online benefit auction to raise money to support SAQA's exhibits, publications and educational programs.  This year's auction runs from September 14 to October 8.  over 380 pieces of quilt art, all 12" square, will be available for purchase.  This is a "reverse" auction.  Sept. 14 is diamond day, when all pieces are available for $1000.  The quilts are divided into 3 groups and the following Monday, the 1st group opens for a bid at $750. Prices drop at 2 PM each day until reaching a final price of $100 on Saturday.  The process repeats with the other 2 groups until Oct. 8.  


You can learn more about the auction here. You can view all the quilts online as well as register for Handbid which is the company handling the auction.  There are also Dream Collections available to view - groups of 8 quilts that members have chosen that have a common theme or color story.  

Sue has again contributed a quilt to the auction.  It is called "Filtered" and combines shibori/indigo dyed fabric, rusted fabric, and a cyanotype print done on a coffee filter.  It has both hand and machine stitching.  

Go to the website and check out the quilts.  Even if you choose not to bid, there's lots of inspiration and eye candy!

Monday, August 21, 2023

Harrisonburg Quilt

Over the weekend, Virginia Consortium of Quilters (VCQ) sponsored a "slumber party" sew-along in support of the Virginia Quilt Museum.  Wendy Sheppard created a pattern for one of the museum's historic quilts that is for sale on the museum website.  It has been named the Harrisonburg Quilt and served as a fund raiser for the museum, which also sponsored a sew-along.  You can find the pattern here.


Sue participated in the VCQ sew-along and now has 4 blocks completed (2 sewn during the sew-along).  It is not a difficult block but does require accurate piecing. The slumber party included visits/interviews with Alicia Thomas, the museum's executive director, and national quilter Pat Sloan who provided video tutorials for construction of the quilt, and Wendy Sheppard, the pattern designer.  They were all very informative and provided excellent tips.  


The photo above shows the steps in the block construction.  Top left, sewing half-square triangles to the center square.  Top right, adding more half-square triangles to the center square.  Bottom left, strips including half-square triangles are added to two opposite sides.  Bottom right, final strips added top and bottom that have 2 half-square triangles on each end.  


So far there are 2 green blocks and 2 pink blocks.  Sue's plan is to make 20 blocks (4 x 5), slightly smaller than the pattern.  More colors will be added, with 2 blocks of each color.  Below are the ones cut so far.


The slumber party was very fun and capably led by Kelly Zuber.  There were some fun contests for prizes and polls as well as show and tell of completed blocks.  It's always fun to see everyone's fabric choices.  VCQ has plans for upcoming in=person and virtual meetings/classes and other special events including our Celebration retreat next spring at Smith Mountain Lake.  Check out VCQ's website for more info.

Tuesday, August 15, 2023

DIY for Chair Arms

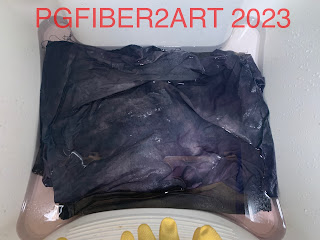
Sue recently got new chairs for her family room.  Much to her surprise, they did not come with covers for the chair arms - the part most susceptible to wear.  So she decided to try a do-it-yourself project to make some. Some fabric store remnants of cotton duck and linen-like fabric seemed suitable for attempting to dye something that might work.  The last vestiges of elephant gray dye left in the jar would have to do.  If it didn't work, nothing lost; just come up with another plan.


Two half yard pieces were put in the dye bath.  One was white, the other a beige color.  The dye bath looks purple because that is one of the component colors of elephant gray.  After sitting in the dye for 24 hours, the rinse process started. 

Here it is soaking in the laundry tub.  You can see here it looks more gray than purple.  


Here are 4 shots of different areas of the washed & dried fabric.  Some areas are gray, some more blue, some purplish.  Not enough dye to come out solid, but homogeneous enough to give an overall impression of gray.  Sue decided it would well enough with the new gray chairs and set about crafting the arm covers.


She made rectangles long enough to cover about 5-6 inches of the front and most of the top.  After clean finishing the edges, she fit each one on the chairs, folding in triangles at the corners for a snug fit.  After stitching the triangles in place, they were ready.  Sue is satisfied with the result.  What do you think?  

Monday, August 7, 2023

Altering Cyanotype Prints

This is a repost from October 2021 when we attended a Red Thread Retreat with Lesley Riley to learn more about cyanotype/botanical printing.  

At the Red Thread Retreat, we enjoyed learning ways to alter our cyanotype images by using different chemicals and techniques. Serendipity is also a big part of the process. Even though you change things up from a traditional blue and white cyanotype print, you never know what you will get when you start adding other components to the experiment.  There is a lot you also don't have control over such as the amount of sunshine, the humidity and the angle of the sun.  You can somewhat control other additives to the botanicals placed in your design.


To end up with the image above, a piece of watercolor paper which had been treated with the Jacquard Cyanotype chemicals was used. Once the botanicals were added some turmeric and then Ferrous Sulfate was sprinkled around the edges of the plants.  The very interesting results on the left of the paper was from a leaf that had many holes in it having fallen on a gravel parking lot and been run over by cars.  The piece was also lightly misted with a vinegar and water solution.


For an October day we were fortunate to have warm temperatures hoovering in the high 70s to 81 with lots of sunshine so the paper. with plants and chemicals incased under a piece of glass, sat out in the sunshine of the parking area for at least half a day to "cook".


When the botanical materials were removed, the image looked like this but it still needed rinsing off in cool water to remove all the chemicals.  Before rinsing it looked like this:


The development process can still continue for a day or so, the final image looks like this now.  It might get cut up to put into a new collage and likely that geode looking area on the left will be a highlight of a new piece.


Monday, July 31, 2023

More Cyanotype Experiments

This week's experiments included some less successful additives to the process and one complete transformation.  Two prints were set up as before.  This time the additives were line juice and dry mustard on one (left), vinegar and turmeric on the other  (right).  


Prints during exposure above.  After exposure but before rinsing below.


These 2 fabric pieces were previously treated with the cyanotype solution - with an excessive amount, which is why they are such a dark blue compared to the pieces shown last week.  Most of which got washed down the drain in the rinse process, so a word of caution if you do this yourself, don't overdo the amount of solution!  Below are the 2 pieces after rinsing and drying.


You'll notice that there is very little effect from the additives used on these 2 prints.  Maybe because of the amount of solution/darkness of the blue?  Just guessing here. So Sue decided to try both a soda ash solution and a washing soda solution on one to see what would happen.  Both of these act like bleach to take color out.  She started by adding drops with a small paint brush, and then also using a fan shaped brush to try to add streaky swirls.  Since it takes a little time to react, it's hard to know if you've added enough, and very easy to add too much.  And of course, the too much is what happened.  


But it's all an experiment, right?  The idea was to try to make a speckled background but the spots where the fan brush was applied turned out more solid than streaky.  So the next option was to take out all the blue by submersing the whole piece in the washing soda solution.  


And this is the result.  What do you think?

Monday, July 24, 2023

Cyanotype Experiments on Fabric

To continue with cyanotype, Sue decided to make some fabric prints last week and try a little experimenting.  Nothing outlandish, just some simple additions.  Her usual go to for altering backgrounds is to spritz with water and a soda ash solution.  This time the solution must have been pretty strong (or the chemical coating for the cyanotype was thin) Because it worked almost like bleach and completely took out the color in places.  Or maybe she was too heavy handed with the spray?


Above are the 2 pieces set out in the sun.  The places that appear yellow in the photos are where the soda ash solution was sprayed.  The brownish spots are sprinkles (or clumps) of turmeric.  


These are the 2 pieces after a few hours in the sun, before removing the glass and plant material.  The plants, by the way, are a mixture of ferns, nandina leaves, money plant seed pods, and an unopened blossom from the nandina.  


Here's what they look like after removing the plant material but before rinsing. It takes several rinses in cool water to rinse out the cyanotype solution.  Continue rinsing until water runs clear.  Usually, Sue lets them soak overnight.


Above are the two prints after rinsing.  You can see in the one on the right how the soda ash solution took out the blue background instead of just giving it some texture.  The gold-brown spots are from the turmeric.  Overall, both pieces turned out well.  Note to self, go easy on the spray next time!  And perhaps some more experiments with other substances to come.  Looks like we're in for some sunny, hot weather this week.