Friday, May 25, 2018

Leaf Pounding with Barbara Wise

Our local guild (Burke Quilters Unlimited) this week hosted Barbara Wise for a presentation on the ancient art of leaf pounding and dyeing with natural elements. Barbara has an Etsy shop (Aunt Lilly's Attic) where she sells rescued and re-imagined vintage fiber items and an Instagram page featuring her fiber art.
Leaf pounding is a Cherokee tradition that was used to decorate garments.  A leaf or leaves are taped to a piece of fabric with the vein side against the fabric; the tape prevents the leaf from shifting.  Then it is turned fabric side up, placed on a hard, lightly padded surface, and pounded with a hammer to transfer the pigment from the leaf onto the fabric.  This process produces very soft colors, and often the color you get from the leaf changes or fades after a fixative is applied.  But the results are still wonderful.
Barbara has used her leaf prints to create lovely pieces of wall art.
She sometimes enhances the prints with watercolor pencils to add a bit of color or definition.
In the piece above, Coral Bells, she has also incorporated embroidery. Isn't it pretty?
She had several small pieces mounted on wooden canvases that incorporated embroidery or applique.  The pounded leaves can also be turned into dimensional appliques by backing with felt.  Fabric used for pounding must first be prepared with a mordant (a treatment that allows the color to bind with the fabric).  When dyeing with plants, some require a mordant and others do not. Find more info about leaf pounding and plant dyeing on the web.

Barbara will be leading a workshop for the SAQA Northern Virginia pod in June and Sue is looking forward to participating and trying her hand at this ancient technique.

Monday, May 21, 2018

Whisper Challenge

Over the past year, Sue's art quilt group participated in a challenge we called the Whisper Challenge.  Think of it as the quilted version of a game of "telephone" that you may have played as a child.  This is how it worked.  The first person in the challenge selected a photo and made a quilt based on that photo.  She then passed her quilt (not the photo) on to the second person.  The second person had a month to make a quilt based on the first quilt, which was then passed to the third person.  This process continued through 9 people, where each person saw only the previous quilt.  The only "rule" or guideline was size, which was 18x24 inches.  When all 9 quilts where completed, the results were revealed to the whole group. 
This photo of an individual from Tibet was the original photo chosen by Bobbie Dewees.
Her interpretation of the photo is shown in the quilt on the left above.  As you can see, she stayed pretty true to the original photo.  The second quilt (left to right) is by Willa Downes, who gave a Caribbean island twist to the original.  Third in the challenge was Barb Sherwood whose quilt takes on an African interpretation.  Fourth was Judy Albert, who selected a n Indonesian batik panel as the focal point of her quilt.  So far, we are taking a rather international tour!  Click on the photo for a closer look at all the quilts.
In the photo above, we again see the fourth quilt, followed by Anna Willard's interpretation.   She was inspired to create an African dancer, with a "Gee's Bend" style improvisational background.  The sixth quilt by Linda Cooper took the dance interpretation and focused on a gymnast (her daughter) on a balance beam.  Sue's quilt is the seventh; she found inspiration in the concept of  balance and the diagonal line of the balance beam so in turn screen printed these "birds on a branch" as her focal point.
Judy Grumbacher was the eighth participant and based on Sue's quilt, created this improvisational tree. And finally, Barbara Wise used the tree inspiration to create a whimsical tree of her own, but one that included birds. 
Here's a shot that shows the progression in all 9 quilts.  Quite a change from first to last!  But you can see how each quilter took some aspect of the previous quilt as inspiration for their creation.  We all enjoyed this concept, and are planning to start a new challenge this fall.  There will be more participants, so it will take a full year to complete.  We hope to exhibit this year's completed challenge in the 2019 Quilters Unlimited quilt show.  Members of the art quilt group are from Burke, Fairfax, and Vienna QU as well as the Norther Virginia SAQA pod.  

Monday, May 14, 2018

Guild Retreat

Three weeks ago Sue spent a long weekend at her local guild retreat.  However with all the activity of April she somehow missed writing about it.  On Friday of the retreat we had a 1 day workshop with Terry Kramzar of Pennsylvania.  She led a workshop called "pieced quilting in layers". 
Sue had seen her work in a Quilt Odyssey show a few years ago and was eager to learn her technique.  Terry was an excellent instructor and really nice.  Her technique involves layering squares of the background fabric with fusible batting and quilting those two layers.
Various piecing techniques can be added next including an appliqued center square, adding triangles, and inserting strips.  Then the squares are joined into rows and then the rows are seamed to create the finished piece.
It's a very simple but effective technique, and low stress sewing.  No matching seams or points.
We had 19 people in the workshop.  Below are some of the projects the group worked on.
This is Sue's 5 x 5 grid of squares sewn together.
In addition to the class, Sue worked on a few other projects.
This fat quarter pop up, with the pieces previously cut out, was a quick starter.
Sue added the flower petals to 4 of these "free wheeling single girl" blocks to make into preemie quilts. 
And she started the quilting on this portrait from the Hollis Chatelain class at the beginning of April. It was a fun and productive weekend!

Thursday, May 10, 2018

Design & Wine at ArtSpace Herndon

Earlier this year we were invited to lead a Design & Wine session at ArtSpace Herndon and that event was held this past Tuesday.  Our project was printing tote bags with thermofax screens.  This was a new venture for us in several ways - new venue (we also led a Sunday class for kids dyeing t-shirts), new format/time frame, and a specific project.  Usually we teach screen printing as a more open-ended technique for fiber & mixed media artists, so we are not as concerned with a finished product.  It was a fun evening, we all learned a few things, and everyone had a product they could take home.  Hopefully some will want to learn more about thermofax printing!  Here are some photos of our experience.
Some attendees were groups of friends and/or regulars at Design & Wine events.
There was a mother/daughter pair.
Some chose a single image as a focal point.
Others chose to create an overall design.
Here's most of the group with their printed totes.
A small group of friends and their finished bags.
One enterprising individual also brought a t-shirt and created this design with our peacock feather screen.

ArtSpace is a nice environment for teaching a class (our class was held in the gallery).  As you can see in the photos, there is art work hanging in the background - the current exhibit is work by Herndon High School seniors, as well as work by Melanie Stanley, a local artist.  If you are in the area, stop in and take a look at the exhibit and explore other opportunities at ArtSpace Herndon.

Monday, May 7, 2018

Indigo T-shirts with Kids

Sunday at Herndon ArtSpace we taught a group of 7 kids and 1 mom about dyeing with indigo and some methods of creating resists for the dye called shibori.  Indigo is a natural dye that historically comes from plants, but a large amount of the dye produced today is synthetic.  It is the dye that is most often associated with denim and blue jeans. After learning some simple folds and other ways of creating resists with marble and golf balls, the girls practiced with bandanas.
Then we went outside to start the dyeing process.  The indigo forms a "flower" on top of the pot, which is basically foam, that needs to be removed before putting anything into the dye. After wetting the items to be dyed in plain water, they were ready to go into the indigo. 
It's important not to create a lot of movement in the indigo pot because that incorporates too much oxygen.  Hold the object you are dyeing below the surface and gently massage to work the dye through the layers. When the items are first removed from the indigo, they are green.  But exposure to oxygen in the air changes them to the familiar blue color.  Here are some of the bandanas.  You can still see small amounts of green in the first one.


After dyeing the bandanas, they prepared their t-shirts and went through the same process.  Here are some of the results.


They all seemed to have a good time and everyone had successful results.  It was fun to share this technique with a different age group!

Friday, May 4, 2018

VCQ Celebration 2018

It's been a busy month and we've fallen behind on the blog posts, so time to catch up!  Last weekend Sue and Elizabeth participated in VCQ's (Virginia Consortium of Quilters) biannual Celebration retreat at Smith Mountain Lake.  Every 2 years we gather for a a long weekend with 2 days of classes with nationally known teachers.  The 4-H Center at Smith Mountain Lake provides an all-in-one facility with dorms, dining hall and activity center and classrooms.  It's a lovely setting.
Along with classes other activities fill the weekend.  The first afternoon starts with a "meet the teacher" event where teachers have books, patterns and other items for sale as well as being available to meet and greet the attendees.  The after dinner program on the first night always includes a show & tell of projects from past Celebrations that people bring back finished. Here are some from this year.
This is Equal Rights, a pattern by Susan Emory of Swirly Girls that was taught in 2016.  There were quite a few of these in the show & tell which must have been gratifying for Susan as she returned to teach again this year.
These 2 were from a Bonnie Hunter class several Celebrations ago.
These 2 were from Victoria Findlay Wolfe's Double Wedding Ring class in 2016.
Another feature of Celebration is Block Lotto.  The committee chooses a block and makes kits, which members purchase, make the block, and return them to the committee.  For each block you turn in, you get a chance to win a set of blocks, or as was the case this year, one of 3 finished quilts.  In addition to the finished quilts, there were also several sets of blocks.  Sue won one of the sets of blocks, but will have to make the quilt herself.
 
The theme of the retreat was "Circle of Friends: Silver and Gold".  As in the past, there was a challenge based on the theme to make a wall quilt that illustrates the theme.  (Sometimes the challenge is a wearable item instead of a wall quilt.)  The picture above is the first place winner.
Sue's first-day class was called Circle Play with Karla Alexander.  We learned to set in an exact arc, and also to sew improvisational arcs.  Karla was also the speaker for the Friday evening program. Elizabeth was in a class with Susan Emory (Cosmos) which you'll see pictures of in show & tell.
Vendors for the weekend included Kelly Ann's of Warrenton and SewLoveLee from White Stone.  A knife sharpener was also there for one day.
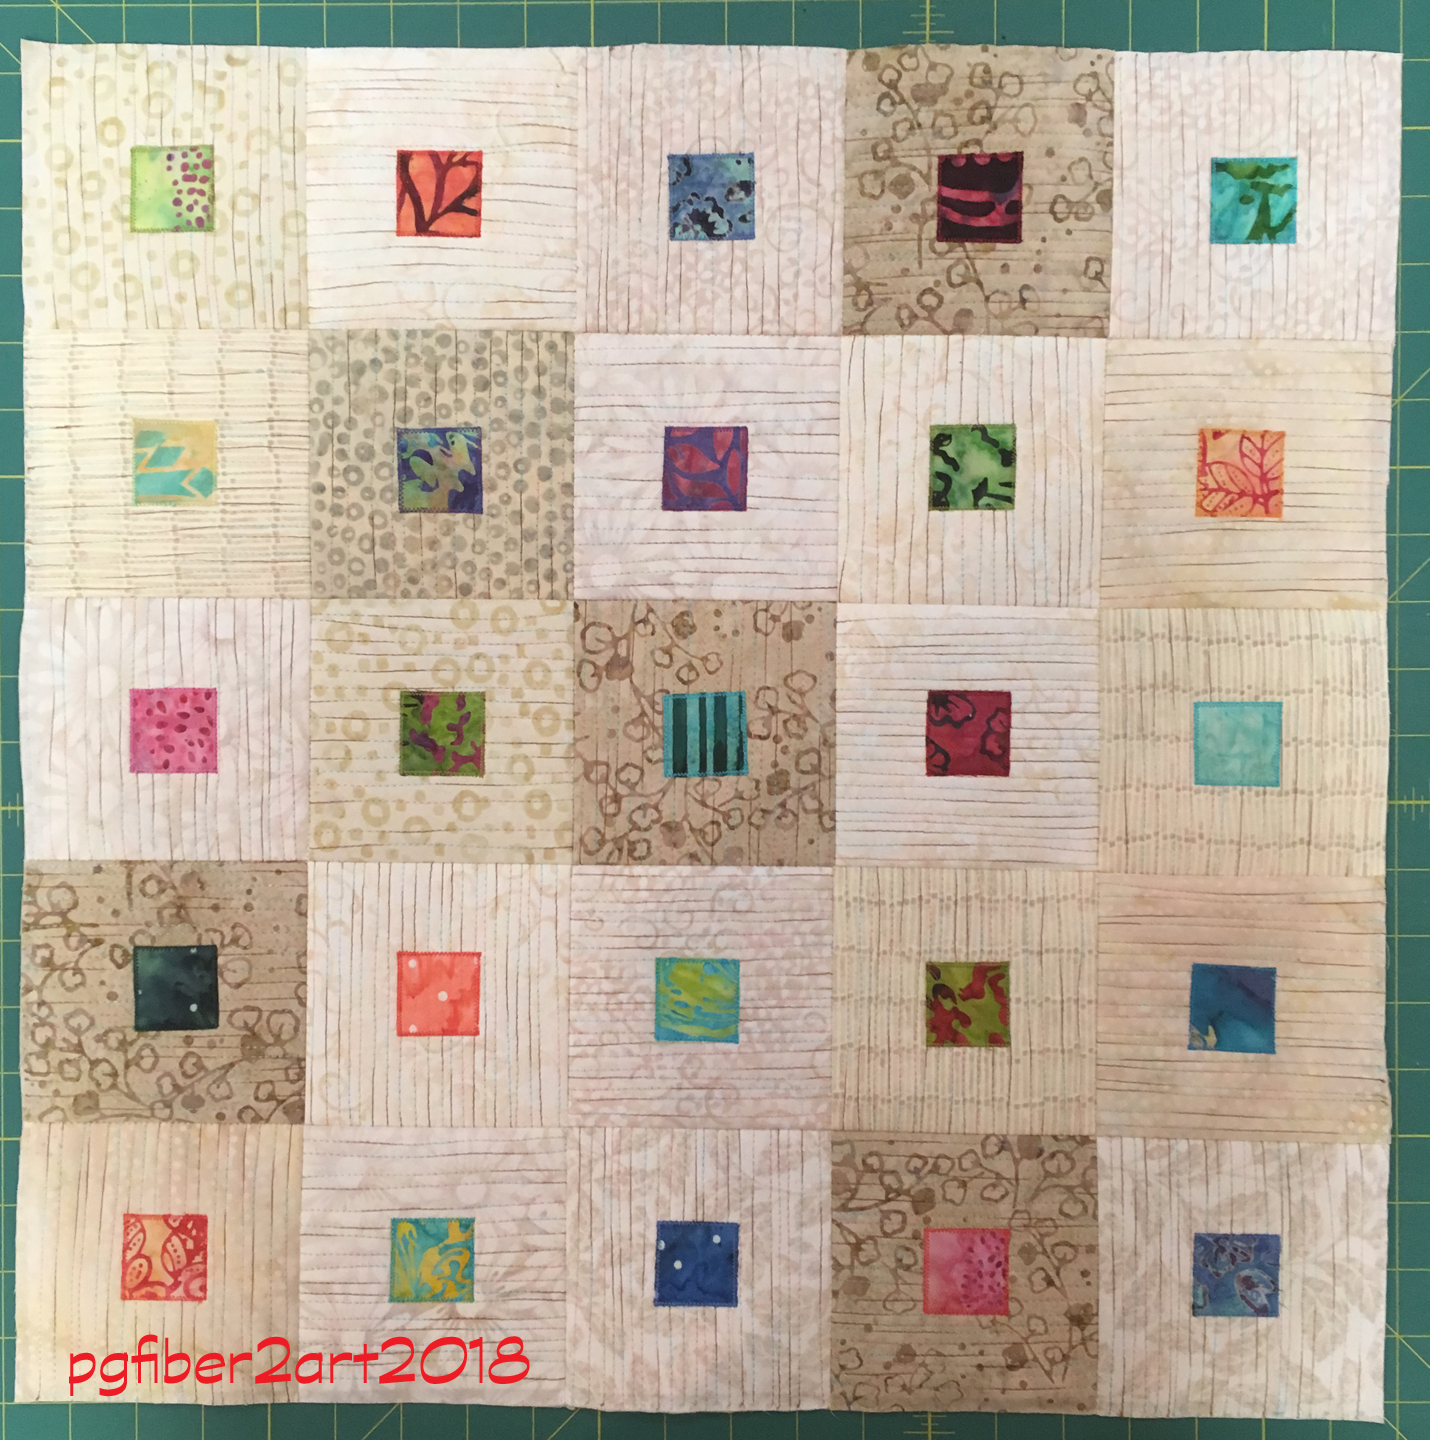
Sue and Elizabeth were both in Karla's Paint Chip class on Saturday.  Above are Sue's completed blocks - it was nice to get all 20 blocks done in one day.  This pattern is in Karla's book Stack, Shuffle and Slide.
Mary Huey was the Saturday lecturer.  Her talk on color emphasized the importance of value, and made some memorable points.  In addition to previously mentioned activities, there was also a silent auction, peddler's table and raffle items.  On Sunday morning we wrap up with a show & tell of the classes from the weekend.
Melinda Bula taught fusible applique - a zinnia on the first day, and a rose on the second day.
These are some the blocks made in Susan Emory's Cosmos class. Her 2nd class was a Happy Place wall hanging.
Augusta Cole taught a strip-piecing class (above) and a mystery class (below).


Laura Blanchard taught this reversible table runner on the first day and "blocks on the move" the 2nd day.
Carolyn Friedlander taught a paper-pieced Envelopes class; her 2nd day class was hand applique.
Mary Huey's first class was a feathered star; pictured here is her 2nd class, a diamond star.

We had a great time and look forward to going back for another retreat in 2020, hopefully with some finished projects for show & tell!