Monday, August 21, 2023

Harrisonburg Quilt

Over the weekend, Virginia Consortium of Quilters (VCQ) sponsored a "slumber party" sew-along in support of the Virginia Quilt Museum.  Wendy Sheppard created a pattern for one of the museum's historic quilts that is for sale on the museum website.  It has been named the Harrisonburg Quilt and served as a fund raiser for the museum, which also sponsored a sew-along.  You can find the pattern here.


Sue participated in the VCQ sew-along and now has 4 blocks completed (2 sewn during the sew-along).  It is not a difficult block but does require accurate piecing. The slumber party included visits/interviews with Alicia Thomas, the museum's executive director, and national quilter Pat Sloan who provided video tutorials for construction of the quilt, and Wendy Sheppard, the pattern designer.  They were all very informative and provided excellent tips.  


The photo above shows the steps in the block construction.  Top left, sewing half-square triangles to the center square.  Top right, adding more half-square triangles to the center square.  Bottom left, strips including half-square triangles are added to two opposite sides.  Bottom right, final strips added top and bottom that have 2 half-square triangles on each end.  


So far there are 2 green blocks and 2 pink blocks.  Sue's plan is to make 20 blocks (4 x 5), slightly smaller than the pattern.  More colors will be added, with 2 blocks of each color.  Below are the ones cut so far.


The slumber party was very fun and capably led by Kelly Zuber.  There were some fun contests for prizes and polls as well as show and tell of completed blocks.  It's always fun to see everyone's fabric choices.  VCQ has plans for upcoming in=person and virtual meetings/classes and other special events including our Celebration retreat next spring at Smith Mountain Lake.  Check out VCQ's website for more info.

Tuesday, August 15, 2023

DIY for Chair Arms

Sue recently got new chairs for her family room.  Much to her surprise, they did not come with covers for the chair arms - the part most susceptible to wear.  So she decided to try a do-it-yourself project to make some. Some fabric store remnants of cotton duck and linen-like fabric seemed suitable for attempting to dye something that might work.  The last vestiges of elephant gray dye left in the jar would have to do.  If it didn't work, nothing lost; just come up with another plan.


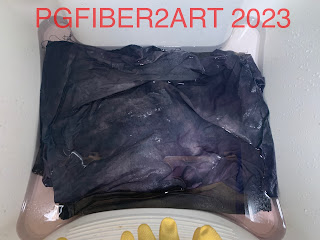
Two half yard pieces were put in the dye bath.  One was white, the other a beige color.  The dye bath looks purple because that is one of the component colors of elephant gray.  After sitting in the dye for 24 hours, the rinse process started. 

Here it is soaking in the laundry tub.  You can see here it looks more gray than purple.  


Here are 4 shots of different areas of the washed & dried fabric.  Some areas are gray, some more blue, some purplish.  Not enough dye to come out solid, but homogeneous enough to give an overall impression of gray.  Sue decided it would well enough with the new gray chairs and set about crafting the arm covers.


She made rectangles long enough to cover about 5-6 inches of the front and most of the top.  After clean finishing the edges, she fit each one on the chairs, folding in triangles at the corners for a snug fit.  After stitching the triangles in place, they were ready.  Sue is satisfied with the result.  What do you think?  

Monday, August 7, 2023

Altering Cyanotype Prints

This is a repost from October 2021 when we attended a Red Thread Retreat with Lesley Riley to learn more about cyanotype/botanical printing.  

At the Red Thread Retreat, we enjoyed learning ways to alter our cyanotype images by using different chemicals and techniques. Serendipity is also a big part of the process. Even though you change things up from a traditional blue and white cyanotype print, you never know what you will get when you start adding other components to the experiment.  There is a lot you also don't have control over such as the amount of sunshine, the humidity and the angle of the sun.  You can somewhat control other additives to the botanicals placed in your design.


To end up with the image above, a piece of watercolor paper which had been treated with the Jacquard Cyanotype chemicals was used. Once the botanicals were added some turmeric and then Ferrous Sulfate was sprinkled around the edges of the plants.  The very interesting results on the left of the paper was from a leaf that had many holes in it having fallen on a gravel parking lot and been run over by cars.  The piece was also lightly misted with a vinegar and water solution.


For an October day we were fortunate to have warm temperatures hoovering in the high 70s to 81 with lots of sunshine so the paper. with plants and chemicals incased under a piece of glass, sat out in the sunshine of the parking area for at least half a day to "cook".


When the botanical materials were removed, the image looked like this but it still needed rinsing off in cool water to remove all the chemicals.  Before rinsing it looked like this:


The development process can still continue for a day or so, the final image looks like this now.  It might get cut up to put into a new collage and likely that geode looking area on the left will be a highlight of a new piece.