Wednesday, November 14, 2018

Elvis Exhibit at IQF

Now that we're home and somewhat back to a normal routine, we can share more from the International Quilt Festival. We arrived at the George R. Brown convention center about 1:30 in the afternoon.
It was the first trip to Houston for both of us.
We entered the center on the second floor from the parking garage and had been advised by fellow quilters to check out the view from the round windows on that level which overlook the convention center floor.  We later found out that the GRB is designed to resemble a ship, hence the round windows.
Above is a look at the vendor section.
And this is the quilt show section.

The first place we went was to see Sue's quilt in the OURstory exhibit.  However, due to prohibitions on photography, we can't share photos of that exhibit.  (not until we get an OK from Susanne, our fearless leader).  But there were no limitations on the Elvis exhibit, curated by another friend from Northern Virginia, Donna DeSoto.  The Houston exhibit included 40 of the 96 quilts in the collection that celebrate the life and career of Elvis.
Jail House Rock is by Lesly-Claire Greenburg of Fairfax, VA.  The main technique is fused raw-edge applique.
Goodnight from Elvis is by Kaye Sauer of Queensland, Australia.  It is machine appliqued, quilted and embellished.
Debra Gabel of Clarksville, MD, made Elvis: A Portrait.  She used painting and machine quilting to create the look of a faux postage stamp.
Pink Cadillac is by Susan Bynum of Falls Church, VA.  The 1955 Cadillac was Elvis' favorite and can still be seen at Graceland.
Lucky in Love 2 is by Ricki Selva of Fort Myer, VA.  Her piece represents Elvis with his most famous leading lady Ann-Margret.
Blue Suede Shoes is by Joyce Carrier of Bluemont, VA.  The famous song warns against stepping on his blue suede shoes, but Joyce imagines that perhaps there was one that could step on them.
Fever by Claire Josiak of Calgary, Canada, is based on the lyrics "cats were born to give chicks fever".  This whimsical quilt was a fun addition to the group.

All the quilts in the collection have been published in a book called Inspired by Elvis: Art Quilts Celebrating the King which is available from Amazon here.

Monday, November 12, 2018

IQF Houston - Saturday Sampler

If you don’t follow us on Facebook or Instagram, you may not know that we have been in Houston since Thursday for International Quilt Festival. This is our first time attending the festival and it has been inspirational and overwhelming at the same time. The impetus for coming was that Sue had a quilt in one of the special echibits (sorry; no photos allowed yet due to pending book publication). But we have TONS of other pictures to share!

We’ll start with an event we attended which was the Saturday Sampler. There were 28 teachers in a large ballroom, each doing 15-20 minute demos/presentations. You could choose the ones you wanted to visit over the 2 hour time frame. It was a great way to find out more about a teacher and what they do, and pick up a few tips and tricks.


We first visited with Cindy Lohbeck who demoed her process for Ice Dyed Shibori. We have both done this process but it’s always good to pick up a few tips from experts.
She gets wonderful results and was featured in an article in Quilting Arts magazine (Dec. 2017/Jan. 2018).
Ana Buzzalino demonstrated the use of Inktense Pencils on Fabric.
Melody Crust talked about the elegance of straight line quilting.
Maria Shell explained her method of Improv Quilting, which starts ny making striped fabric out of solids, and using the stripes in various ways to create other patterns.
Jenny Lyon talked about choosing threads for machine quilting on a domestic machine. She is a fabulous quilter.
Judy Gauthier’s topic was Using Scraps to Make Beautiful Quilts. She also talked a bit about color theory.
Karen Miller is an Aurifil thread educator who focused specially on Aurifil thread.

The 2 hours went by quickly and we felt it was a good way to learn a lot in a relatively short period of time.


Monday, October 29, 2018

Print and Collage

A new group of students joined the ranks of screen printers this weekend in the Print and Collage class with Sue.  (Elizabeth is in North Carolina to care for her uncle who had knee surgery).  We were a small group but able to explore and discuss techniques in a bit more depth than usual. 
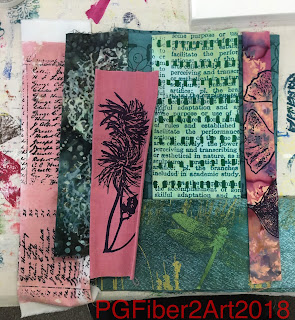
Students were particularly interested in the various techniques Sue used to create these mini quilts and canvases.
Our morning was spent on instruction and practice printing.
After lunch, we talked about how the elements and principles of design are incorporated into collage/art quilt design.
Though "rules" are not hard and fast, being familiar with them helps to intuitively put them into play when designing.
Lawrence is creating the base of his collage with commercial fabrics that he adds printing to in the photo below.
Unfortunately I didn't get a picture of the completed print.  He very cleverly completed the money plant print on the purple strip with discharge instead of black.  Discharge takes color out, so that part of the print is greyish-white.  He clearly likes to play with opposites.
Marianne worked on a piece using the tree bark screen as the background. 
Grace is perfecting her technique.
Sandy's birds, above, give her options with different fabric and paint color selections.
Her money plant print turned out great, ready for a future piece.

If this piques your interest, watch for our next session of Thermofax Screen Printing in the new year and join us to learn this fun surface design technique.

Thursday, October 25, 2018

Penni Domikis - Cabin in the Woods Quilters

Last night Sue's local guild hosted Penni Domikis for a trunk show of her "All Scrapped Out" quilts.  Penni is a quilter/teacher/designer whose business name is Cabin in the Woods Quilters.  Sue and Elizabeth have met Penni and gotten to know her through the Creative Arts Business Summit and also took a class with her when she taught for VCQ.  Her trunk show covered her journey as a quilter beginning with her quest to use up/tame her scraps.  In the process she has published 3 books - All Scrapped Out, Still All Scrapped Out, and What a Load of Scraps, as well as individual patterns.  In addition, she produces her own line of templates and English Paper Piecing patterns.  Here are some pictures from the trunk show, with apologies for the poor view, but I think good enough to give you an idea of Penni's work.
This one includes string quilting and crazy quilt blocks around the border.
Here Penni combines the traditional spool block with strip pieced centers.
In this basket quilt, Penni made it unique by using ric-rac for the basket handles instead of bias strips.
This is Penni's interpretation of combining scraps in a more modern design.
This red and white quilt is stunning.
Penni used aprons from her grandmother and great grandmother to create this charming apron quilt.
This is one of her more recent designs using her petal templates to create a layered look.
Here is her version of pickle dish.
This is the third of her 3 books of scrap quilt designs.

Penni is a very entertaining speaker so if your guild is looking for someone for a program, we highly recommend her.  She is based near Fredericksburg, VA.  Check out her website and blog for more information about Penni and her work!

Wednesday, October 10, 2018

Upcoming Classes

We have 2 classes coming up at the end of the month.  On Saturday, Oct. 27, we will be teaching Print and Collage with Thermofax Screens at Artistic Artifacts.  In this class we teach the basics of thermofax printing in the morning, creating a stash of printed fabrics using our collection of original screens.  In the afternoon we will use those screens to create a 12 x 12 inch art collage.  Check out the complete description and supply list on the Artistic Artifacts website.


On Sunday, Oct. 28, we will teach a kid's class at Herndon ArtSpace, block printing on tote bags.  We will do some practice printing first to learn the technique and then the kids will plan their design and print their bag.  We will have a large selection of foam stamps and wooden printing blocks to choose from.  The link above will take you to their page for more info and registration.  If you know any kids you think might be interested, please share this information!


Monday, October 8, 2018

Eco Dyeing

Yesterday Sue took an eco dyeing class with Elizabeth Woodford at Artistic Artifacts.  The class has been taught several times over the last few months and always fills up, so she decided it was time to give this technique a try. It's a slow but interesting process that requires some knowledge about which leaves and flowers contain enough tannin to produce a print on fabric.  We started off the morning with 3 sample pieces on silk (all our dyeing was on silk) to find out how various leaves transfer before designing our scarves in the afternoon.
These were the morning samples.  Some of the leaves with the best results included eucalyptus, rose, coreopsis, plum, oak and sweet gum.  The silk is first soaked in an alum/water solution; the alum serves as a mordant for the tannin molecules to bond with the fiber.  Then the silk was placed on thin plastic and leaves were arranged after being dipped in an iron/water solution.  This sandwich is topped with a piece of cotton that is also soaked in iron-water (known as an "iron blanket").  Then the whole thing is wrapped tightly around a dowel, rubber banded at the ends and wrapped with cord for the length of the dowel to keep it all tight.  Then the bundles must be boiled for 1.5 hours.  A turkey roaster works well for this task
A brick was used to weight the bundles down so they would stay under the surface of the water.

After lunch, the samples were ready to reveal and then we went ahead with preparing our scarves in the same manner.  The cotton iron blanket also is "printed" in the process and can be used in quilt making, or can be washed and reused for more eco dyeing.
Above is Sue's scarf with the leaves arranged on top, and the rolled bundle ready for the steamer.
Here is the reveal after steaming.  On the left, before the cotton and leaves are removed, and the silk scarf on the right.  Some of the lighter areas are supposed to darken as it dries.
These are some closu-ups of different sections of the scarf.
My table-mate, Susanna, did a wonderful job on hers with a grapevine that extended the entire length of the scarf.  You can clearly see the vine down the whole length.  She also did a great job filling in with other leaves.  And her cotton piece turned out great as well.
Lots of hands make light work.  As we revealed each scarf, more of us joined in removing the leaves to reveal the results.
These are close-ups of other students' scarves.  It's really fun to see how the leaves print so clearly and the colors they produce.