Showing posts with label hand stitching. Show all posts

Monday, June 26, 2023

SAQA Benefit Auction

Each fall, Studio Art Quilt Associates (SAQA) holds an art quilt auction as its main fund-raising event. Proceeds support exhibitions, publications, and educational outreach. Twelve-inch square quilts are made and donated by members and then auctioned in an online event over a period of 3 weeks in September/October.  Sue recently completed and sent in her donation.

"Filtered" was made from scraps of shibori/indigo and rusted fabrics along with a cyanotype printed on a flattened coffee filter.  Both hand and machine stitching were used to quilt and embellish.


Here is the background prior to adding the cyanotype where you can see the various fabrics used, all leftovers from previous projects.


Portions were quilted with straight line machine stitching.  Other parts were enhanced with hand stitching.


Above you can see some of the hand stitched circles and a row of fly stitches across the bottom. You can also see the machine stitching that outlines the cyanotype print and a blanket stitch used around the edge.


Here is the backing with corner triangles for hanging, or alternatively a ribbon loop in the center.


And the finished piece.  Watch this blog and our other social media for notice when the auction takes place this fall.  Bidding is open to anyone.  There are always many fabulous pieces of quilt art available.

Monday, April 24, 2023

Quilting Arts TV

Are you familiar with Quilting Arts TV? As a long-time subscriber to Quilting Arts magazine and owners of many DVDs on various quilting and surface design techniques, we're happy to report that it is now possible, depending on where you live, to view current episodes on public broadcasting television. If you cannot find it showing in your area, you can also subscribe to the online version, or choose to purchase a particular series that you may be interested in.  Which brings us to the most recent series, season 2900.  The shows are hosted by Susan Brubaker Knapp, and she is joined by Vivika Hansen DeNegre to share artwork from the Quilting Arts community. 

Series 2900 includes segments with 11 quilt artists including Lea McComas, Margaret Abramshe, Luana Rubin, and Denise Labadie with topics ranging from color to surface design to applique. A unique feature in this season appears at the end of every episode, called Finishing Touches.  Here Susan and Vivika chat about several pieces from the Quilting Arts community that were submitted to the magazine's Readers Challenges.  

Sue has participated many times in the challenges and has had several pieces selected to be published.  In early 2022, past participants were invited to submit to a special challenge just for those whose work was previously published, and the selected pieces are the ones featured in Finishing Touches.  

Sue was delighted to see her piece "Serendipity" featured at the end of episodes 4 and 11, and to hear the comments and discussion between Susan and Vivika regarding her quilt.  


This piece evolved from an "ugly" hand-dye that was overdyed in indigo and became the result you see here, thus the title "Serendipity". The official description of the process is as follows:

Indigo fixes everything!  This quilt started with a rather ugly hand dyed fabric that looked like a brown and white spotted cow.  Last summer my friend and I had an indigo pot going so I decided to overdye it in hopes of improving it.  After accordion folding and clamping plexiglass circles on the outside, it went in the pot.  The outside layers directly under the circles came out great, but the middle was still uninteresting.  So, I cut off strips of the circles, refolded the rest and dipped it in the indigo pot again.  Voila!  Now it looked like art.  I added an original design Thermofax spiral print on the brown circles and echoed the circles across the center, doing all the quilting with hand stitch.  


The photos above show the original ugly fabric, results after 1 dip in the indigo pot, and final configuration after a second dip in the indigo.  It was a great exercise in creativity and "going with the flow" of unpredictable results.  


Above is a detail shot of the finished piece.

If you're not yet or haven't recently been a watcher of Quilting Arts TV, please check it out.  There are so many interesting techniques featured and so much to learn from the Quilting Arts community!

Tuesday, April 18, 2023

Treasures Among the Trash

Sue's husband has spent much of the last year cleaning out his parent's house after his mother's passing last May.  Recently he unearthed her fabric stash and brought it home for Sue to go through.  Most of it is apparel and home decor fabrics from the 1970's and 80's, but buried within the piles was a bag containing molas - hand applique pieces from Panama.  Are you familiar with molas?  They are colorful applique pieces made by the Kuna Indians, from the San Blas Islands, which are an integral part of their native costume and popular among tourists to the area.  Elizabeth is our resident expert on molas, since she lived in Panama while her husband was stationed there with the Air Force and has a personal mola collection of more than 400 pieces.  Publicity from a 1963 article in Women's World Weekly popularized the idea that a mola was a stack of fabric cut down through multiple layers to show the different color from each layer, thus the term "reverse applique".  In reality, most molas are 2 layers and sometimes 3 with the other layers as inserts of small pieces of fabric stitched down with tiny stitches just as would be a traditional applique.  Imagine how thick and hot, living in a tropical climate, a garment made of many layers would be if the term reverse applique applied to the entire technique for creating the garment?

This mola (above) is typical of an abstract design used by the Kuna Indians who live on islands along the coast of Panama and Colombia. Mola is the Kuna word for blouse and over the years in western society has become the term associated with the intricate applique panel used to make both the front and back of the blouse. Molas can be classified as acculturation or traditional.  The acculturation molas can be further broken down to representations of commercial items, advertisements and the world from outside the Kuna culture. Traditional molas represent items from their world, many of them depictions of the natural world, geometric and abstract linear designs, as shown above.  Depictions of flora and fauna are also used on such molas and their cash crop, coconuts, is often seen in these designs.


This is a pair of Christmas designs likely intended to be sold to a tourist but made as if they were going to be part of the traditional mola blouse.  One panel on the blouse front and the other on the back.  This is an example of an acculturation mola.  When the maker cuts out pieces of one layer on one panel, they can be swapped in the mirror image of the second panel.  Molas meant to wear always come in pairs and are typically sold together.   The vertical slits, called cigar slits, to take up the negative space around the bell design are slits made in the top layer and small pieces of fabric inserted behind and then stitched to make the cigar shapes.  The fabrics in these slits are not one solid piece across the entire mola.  The cigar slits are used by stitchers from one section of the Kuna community and can be traced back to the islands of the maker.  They are loosely stitched together just to keep them as a pair for sale.  Likewise, the pair below of stylized birds.


Though intended to be used together in the construction of the blouse, they could certainly be used separately, perhaps on a shirt, maybe a tote bag, or the focal piece of an art quilt by the buyer.  These roosters are surrounded in the negative space by a maze-like design which indicates another area of the Kuna community of stitchers.  The feathers are appliqued down using small colorful fabric bits saved when making other pieces.  Kuna women use all the fabric down to the smallest of pieces.


This parrot is a non-traditional mola, a single piece and has embroidery stitching in addition to the applique. It is meant to be sold to a tourist and not to be used by a Kuna herself.  Kunas travel from their islands to the city in Panama, typically for medical care and have found a market for small mola styled pieces to be sold to tourists.  There is a cooperative market in Panama City which assists them in reaching a market.  When the US was still managing the Panama Canal, many military members were stationed in Panama and bought molas to bring back to the US as souvenirs.  


Finally, there is a collection of tourist molas, smaller pieces - circles and squares that feature fish and birds.  Though stitched together like the larger pairs, that was for purposes of sale, not intended to stay together.  They can easily be separated and used individually or in smaller groups.  The bird on the white background is especially nice.

Though Sue has no particular plans on what to do with these, there are lots of options as mentioned previously.  She may keep some and sell or donate others.  What would you do with them if you found such a treasure?

Wednesday, January 13, 2021

Imagination: 1 x 4

The Studio Art Quilt Associates (SAQA) Regional groups of North Carolina/Virginia and Washington DC/Maryland/West Virginia issued a challenge last year to members to make a quilt based on the theme Imagination.  They were asked to "use their imagination to escape reality, explore thoughts and feelings, and express themselves by creating a new quilt in a format measuring one foot wide by four feet high". Approximately 70 submissions were juried by Maggie Vanderweit, selecting 50 for the exhibit. Originally intended to be an in-person exhibit, the Covid 19 pandemic altered those plans to make it a virtual exhibit that can be seen on Black Rock Center for the Arts' website now through February 20.  It will also be part of the Mid-Atlantic Quilt Festival's virtual show at the end of February. 

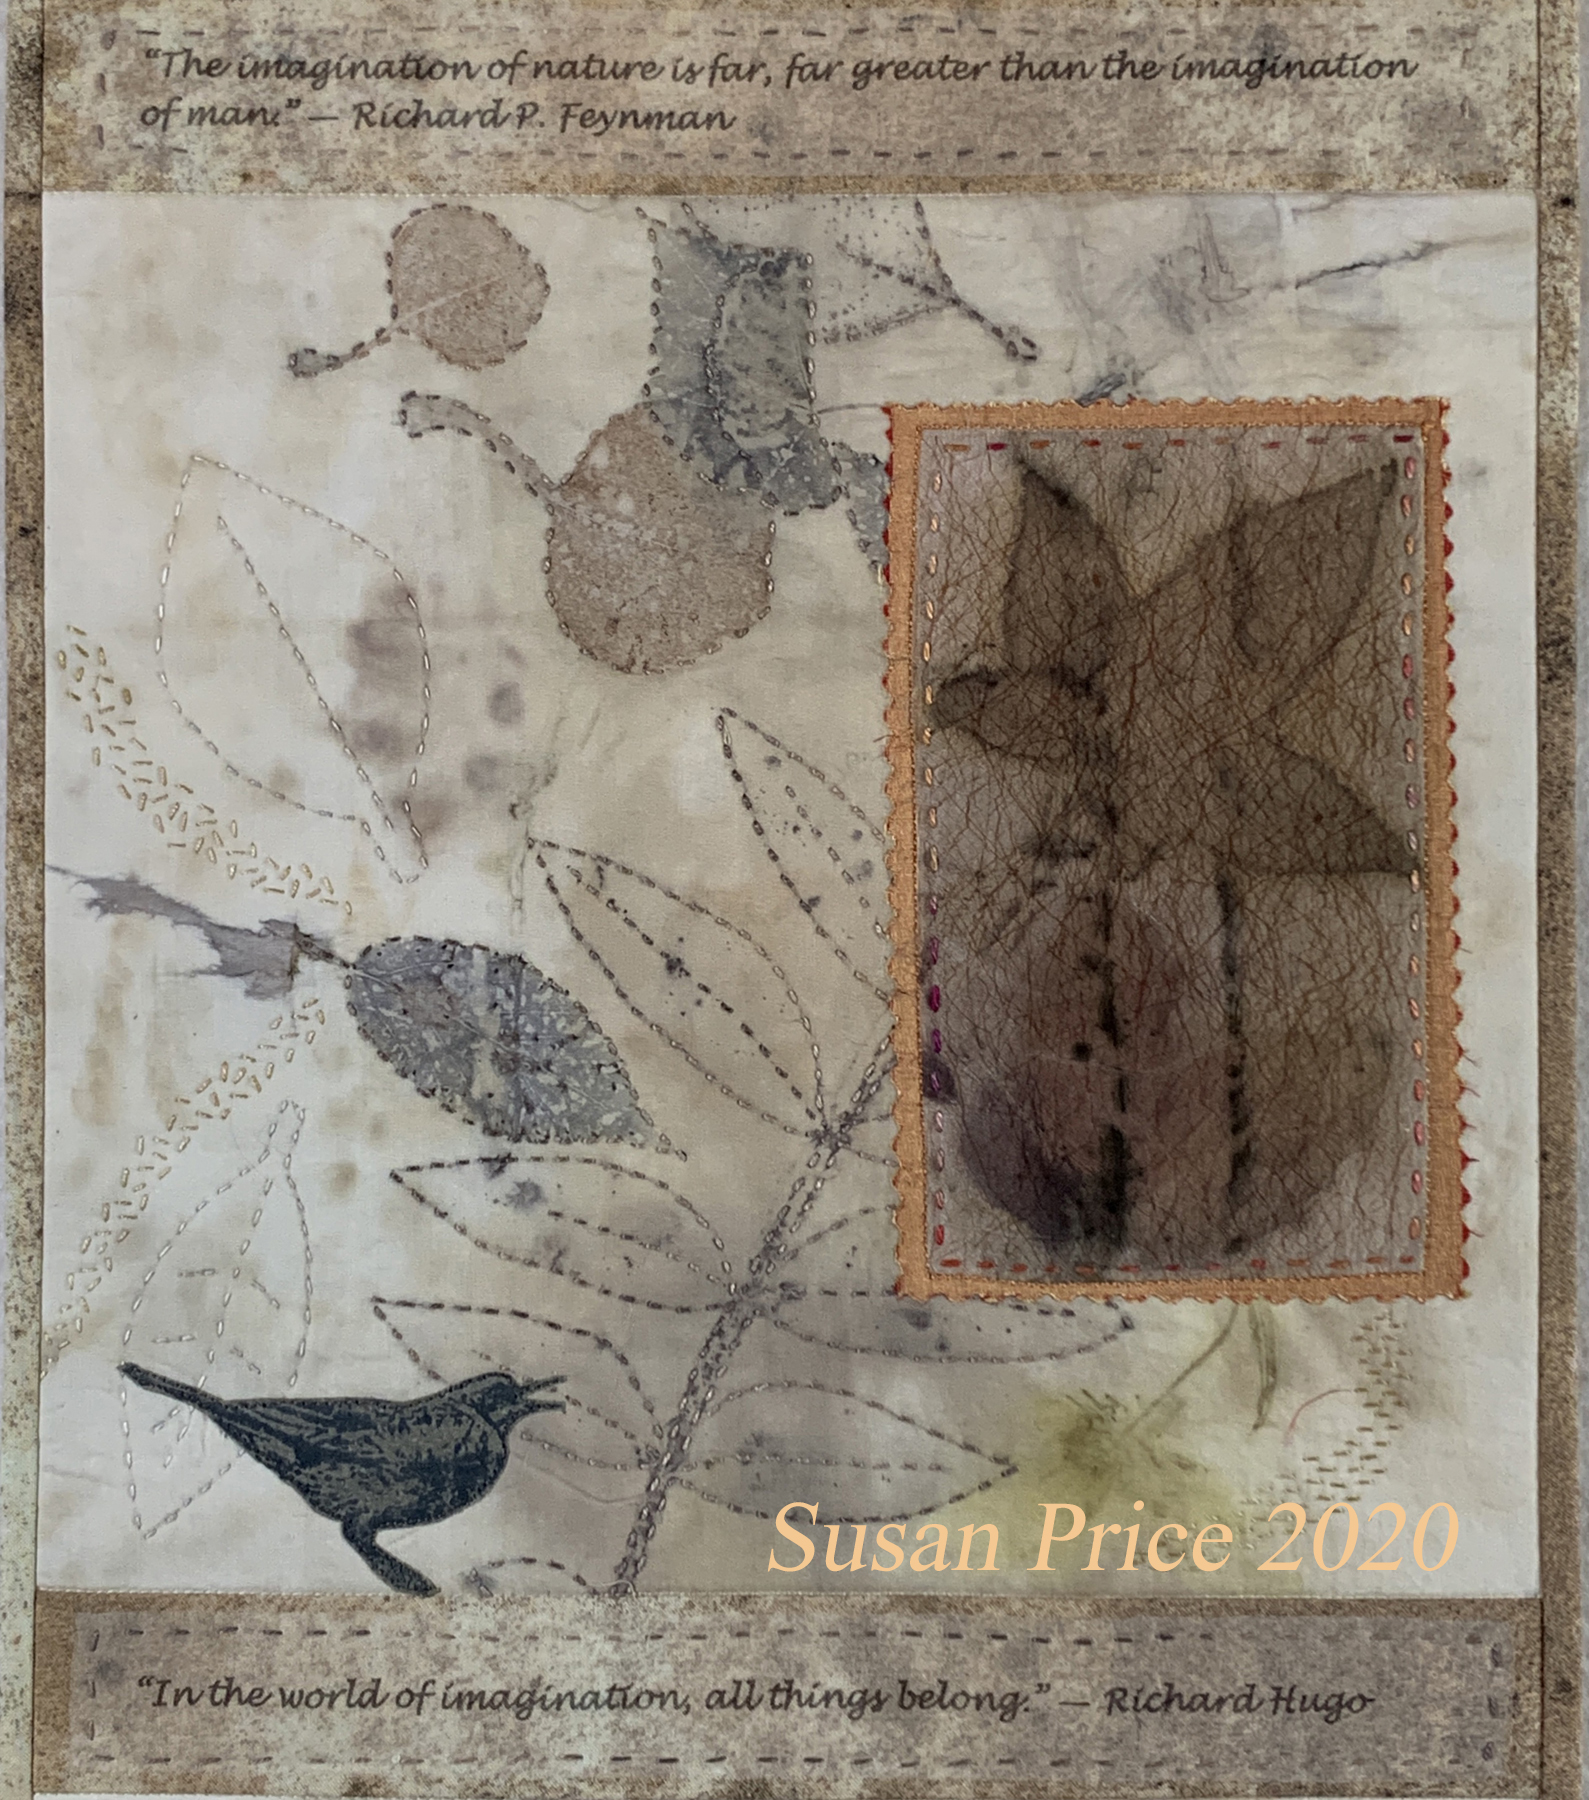
Sue's submission, The Imagination of Nature, is one of the 50 pieces selected. After considering several ideas, a piece of eco-printed fabric came to mind.  It was about 6 feet long by 1 foot wide, so easily fit the size requirements of the challenge.  It served as the "iron blanket" in making an eco-printed silk scarf; essentially, a piece of cotton that keeps the plant material in place in the printing process.  In addition to the length of cotton, there were several pieces of silk used as test prints that might be incorporated in the 1 x 4 design.


Planning began by looking at the length of fabric, measuring, auditioning potential fabrics, and selecting the portions of the print to use.  Also part of the planning was looking for quotes that tied nature and imagination together.  Two quotes were chosen and printed on Extravorganza (organza that is adhered  to a backing for use in an inkjet printer).  The original print was divided into 3 sections, with the quotes forming the divisions above and below the center portion.  Three of the silk prints were chosen and fused to pieces of silk for layering on top of the cotton.  A bird was screen printed on a color catcher (a non-woven fabric sheet used to absorb excess dye in the laundry) and added as a focal point.


Above is the center section.  Except for some machine anchor stitching, the quilting is done by hand with embroidery threads.  Some "ghost" leaves were added to the background with stitching.  


This is the top section, with the largest of the 3 silk prints. 


Above is a close-up of the bottom section.  Click on any of the photos to see a larger version.

The virtual exhibit on the Black Rock website gives you two options for viewing; one is a 3-D gallery view which is a guided tour similar to being in a real gallery.  The second option is viewing a still image of each quilt that can be enlarged for a closer view.  You can also view a separate document of the artists' statements and jurors remarks.  All of the pieces in the exhibit are for sale.  So find a comfortable spot, put on some quiet music, and enjoy a gallery tour of these beautiful quilts!

Thursday, January 30, 2020

The 100 Day Project - Next Steps

Have you heard of the 100 Day Project?  The 100 Day Project is a free art project that takes place online.  You can choose any project you wish and do it for 100 days, sharing your process on Instagram.  If you follow us on Instagram or Facebook (search PGFiber2Art), you might recall that Sue participated in this project last year.  We were surprised to see that we hadn't done any blog posts about this, but all the pictures are on our Instagram page so you can always go back to see the daily pictures there.  Sue's project was to screen print on 5" squares - one print every day.  All of the prints use our original Thermofax screens, a portion of which are available in our Etsy shop.  So, what to do with those 100 prints? Well, part of her plan was to enhance the prints with either hand or machine stitching or both.  To that end, all the squares were backed with fusible fleece to provide some stability for stitching.  The first project from these squares was a 12" square 9-patch quilt that was donated to the SAQA (Studio Art Quilt Associates) online auction.
These are the 9 squares that were put together after printing and stitching - if you click on the picture you should be able to see the stitching better.  Below is the finished piece.  Eyelash trim was couched over the seams for additional embellishment.
Sue has continued embellishing the squares with stitching and is nearing completion of her second project with the squares.  This one combines 20 of the prints that are all framed with brightly colored hand-dyed cottons.
Here's a group of 4 squares in the quilt.

The inner squares were first quilted with monofilament thread next to the borders.  The rest of the quilting is straight line quilting through the border squares with Superior Threads Rainbow variegated thread which has a one inch color change.

You can see the quilting better in this close up photo.  And the whole piece can be seen below.  Again, click on the picture for a better view.
Let us know what you think!  If you were to participate in the 100 Day Project, what project would you choose?  This year's project starts on April 7, so you have plenty of time to consider what you'd like to do!  

A word about the screen prints - as mentioned previously, these are all our original screens made from photos.  We will be teaching a class at Artistic Artifacts on March 7 to teach you how to use Photoshop Elements to transform a photo to a black and white image that can be used to make a Thermofax screen.  If you're interested in learning this process, please join us!

Friday, September 18, 2015

Embellish with Hand Stitching

The final stage of creating Sue's "Falling Leaves" piece was to embellish with hand stitching.  The green background was really begging for some texture, so the first step was filling that in with some "ricing" or "chicken scratch" stitches.
That helped a lot, but also made some of leaves with less paint stand out more - and not in a good way!  So obviously they needed some stitching too.
Here's a close-up of the filled in leaves.
The next addition was using a backstitch to add veins to the applique leaves.
Finally, after adding the binding, which is fused in place, a blanket stitch was added over the edge of the binding. 
The variegated floss adds dimension as well as texture and helps bring the piece to life.

Sunday, September 13, 2015

Published! Autumn Leaves Reader Challenge

Sue is happy to reveal (now that it's published) her submission to the Quilting Arts Autumn Leaves reader challenge!  In fact, it was one of 3 quilts from the October/November issue that was in the running for the cover.  Although not chosen for the cover, it was still a great honor to be considered, and to be in great company with the likes of Susan Brubaker Knapp who created the goldfish quilt that appears on the cover. 
There's a small thumbnail of my quilt on page 6, and the full size picture on page 59. 
Here's a photo of the quilt itself, easier to see than the magazine photo. Click on it for a larger view.
It is made from hand dyed fabrics that are screen printed (actually printing samples from teaching), with 3 printed & fused applique leaves.  Lots of hand stitching in the background and on some of the leaves, as well as a blanket stitch on the binding.   It went through several iterations before settling on the final arrangement, but Sue is pleased with the result and thrilled that the editors at QA liked it too!

Wednesday, May 20, 2015

Black-Eyed Susans

The Quilting Arts magazine June/July issue arrived this week and anticipation was high to see Sue's quilt published in the Reader's Challenge.  Imagine her surprise to see it on page 2 along with the Editor's Notes! 
As Vivika notes in the caption, it reminded her of the flowers growing along roadsides in Vermont.  Coincidentally, this little piece was inspired by a photo taken in neighboring New Hampshire!
After finding the great batik background, Sue set out to create a Buds, Blossoms and Blooms quilt of Black-Eyed Susans.  The first step was creating the flowers using Thermofax screen fusible appliques.  There were 2 different flower images made in different sizes for variety.

The flowers were printed, fusible web was applied to the back and then they were cut out individually.
Placement was decided on the background.
Stems were added (also fused).
The top was backed with a fusible fleece for batting and machine stitching was the next step to secure all the flowers and stems.
There was no backing as yet because hand embroidery was the final step and Sue didn't want that stitching to show on the back.  Here is the start of lots of French knots!
And this is the finished quilt, which also includes embroidery stitches on the stems and other parts of the background.  A bright and cheery piece to celebrate summer!


Saturday, April 11, 2015

On a Roll

This retreat weekend has been very productive.  Today I worked on 3 projects.  I did some hand stitching on yesterday's project, completed a wall art piece, and assembled some squares and circles for a table runner.
 Above I did some stitching in a dark pink in the center of the cherry blossoms.  Below I started stitching the smaller blossoms in a lighter pink, but then decided to stop and save it for later; it's a good TV project.
 Next I had a print that I planned to mount on a canvas frame covered with fabric. The canvas was already covered; I just had to do some stitching on the screen print and stitch it to the canvas.


Then after lunch I was ready to tackle something new.  When packing my supplies, I spied a pack of 5" squares and another packet of pre-cut circles in my fabric cabinet.  They looked like they would play well together, so I threw them in the bag.
Here's what I ended up with.


 The circles are fused to the squares with MistyFuse.  I think it will make a very cheerful spring/summer table runner.  Haven't decided yet if it will have borders and how I'm going to stitch it - a work in progress.  All in all, a very productive 2 1/2 days.