Tuesday, August 23, 2022

More Botanical Printing

Last time Elizabeth shared eco printing on paper with her sister Becky in New Hampshire.  Meanwhile, in Virginia, Sue was also experimenting with botanical printing. Her first attempt was using rose petals to dye fabric.  Fading anniversary flowers were the impetus for this effort which turned out reasonably well.


The fabric was first soaked in a mordant containing alum and washing soda to help the color bond to the fabric.  It was also spritzed with diluted vinegar.  The flower petals were sprinkled on half the fabric, then it was folded in half before rolling and tying


Iron, in the form of rusty keys, was also added to the pot. The bundled fabric was steamed for about 2 hours, then allowed to sit over night before unwrapping.


Then the flower petals were scraped off and the color was heat set with an iron after the fabric was dry.


Sue then decided to try some eco dyeing with other plant materials.  This time she used both fabric and watercolor paper.  The results from this experiment were less than stellar (not enough tannins in the leaves?) so she did a second round with the same fabrics and papers.  The following pictures are after 2 rounds of dyeing.


Fabrics and paper were steamed together, again with rusty bits in the water for iron. The best paper print is the one above. Below are all 6 of the paper prints.


As you can see the prints are not very distinct, but these could potentially be used for overprinting by several methods.  Top on the list to try is cyanotype printing. Likewise, the fabrics do not have distinct prints, just the typical eco-print coloration which I think could make interesting backgrounds for something else.


Bottom line, the eco printing requires a bit more reading/research and experimentation to find the combination of ingredients that works better.  But these are still interesting and will find a use in a project somewhere.

Wednesday, August 17, 2022

Ecoprinting on paper with botanicals


It is funny how when in a partnership you can be miles apart and still be thinking along the same creative lines.  Recently, Sue posted some ecoprinting on fabric which she was working on in Virginia using rose petals while at the same time, here in New Hampshire, Elizabeth and her sister Becky were playing with ecoprinting on paper.

Using several different types of paper, they layered plant material and papers to get a stack which were then squished down between two remnants of fir board, which was not pressure treated.  Other stacks were encased in two pieces of cardboard  (from the backing of the watercolor pad and others from some inexpensive plastic placemats from the Dollar Store).  All of them were pressed down and wrapped with string to make as flat as possible with contact of the plant materials to the paper.


Using vinegar and alum for the mordant and rusty pieces of iron in the water the bundles boiled about 2 hours in an old turkey roaster.

They used inexpensive watercolor paper from Five Below and also large index cards which worked surprisingly well.  As this batch of paper came on a spiral notebook, the rough spiral edges were left to assist with opening and separating the wet pages.  It gave something to grab on to and the spiral edges can be cut or torn off later.

Here are some results.  The first two are different types of ferns, followed by a hydrangea
and then five index cards with sumac designs on them.


This last photo is striped maple where a piece of green construction paper was placed over the leaves in the stack.  That seems like a technique to try again as it was a nice way to introduce another color.


Let us know if you have any experiences with getting botanicals to print on either paper or fabric.  What has or has not worked well for you?


Sunday, March 27, 2022

Untold Stories

It seems we've been absent on the blog for a bit.  Elizabeth broke her hand in February, and both Elizabeth and Sue are spending time on preparations for an upcoming VCQ retreat (of which Sue is chair) at the end of April.  But now that a recent piece of Sue's has been shared on the Colorways by Vicki blog, it's time to share here as well.  Sue created this piece in 2021 as a tribute to her father and his World War II service. It is called "Untold Stories".


Here's her description: "My father fought in World War II, but he didn’t talk about it. I knew he was in North Africa and Sicily but wasn’t interested enough to ask questions when I was younger. When I was 24, he died at age 55 of heart disease. Fast forward 42 years to 2019 when my mother passed away. While going through her things, we found artifacts from his time in military service. They shed some light on his experience but also left other questions unanswered. A brief journal recounts basic training and his first combat in Sicily. What happened after that? What were his experiences in Germany and France? Where and when was he wounded? How did he meet the Barbera family? I wish he was able to fill in the missing pieces of those untold stories."

Sue used Vicki's Barrier Island gradient as background and binding and loves the way the colors tint the photo transfers done with Transfer Artist Paper by Lesley Riley.  Other techniques include photos printed on ink jet fabric and text transfers done with textile medium on a cheesecloth substrate.


Here's a section of text from his journal.  It was only 5 pages in what was an Army issue address book and talked about his basic training and shipping out to North Africa.  From there, a few more stops before being sent to Sicily and seeing his first combat.  And that's where it ends - not the war, just the journal.


The excerpt above describes an American bomb being dropped 75 feet from their fox holes, injuring 18. He also spent time in Germany and France, and was wounded twice. He was awarded a Purple Heart, good conduct medal, combat infantry badge, distinguished service badge and Europe-Africa-Middle East (EAME) service medal.   He was 21 when he was inducted and just shy of his 24th birthday when discharged.  It's hard to imagine what so many endured at such a young age, but also brings deep appreciation for their sacrifices as well as those of our current service members who give of themselves to ensure our freedom..

Saturday, February 26, 2022

Words, Words, Words

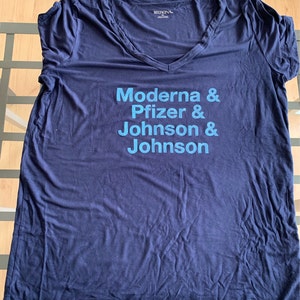
Thermofax screens are a good way to put words or sayings onto ready-made garments, totes, and other items.  Many of our custom clients send us a Word document with their word or saying and we make the screen. A note of caution though that very large solid designs may not print as clearly as other methods of putting a word on your garment.  Fabric texture may also impact how the design screens and all designs should be tested before screening on your final product. Our customers have sent us some great examples of the items they have made with screens they designed using various fonts.

One of our repeat customers had us make these screens to print on t-shirts.


Another customer printed this bag for her husband who is a local historian and leads Ghost Walks in Virginia Beach.  Doesn't it look great?


Elizabeth had fun making these T-shirts for her grandson when he was two.


And then her turned 3, so a new shirt was in order.  Soon he'll be 4, so I guess she'll have to come up with a new phrase!


What an easy way to customize something!  What would you like to put a custom print on?

Friday, October 15, 2021

Evolution of a Collage

 After creating cyanotype prints and background papers, the final step of the retreat workshop was creating our collage.  Below is a short video of Sue's process, what she started with and where it ended up.  You'll notice that some pieces come and go, others change placement.  Believe it or not, this represents about a day and a half of working/re-working to come up with the final composition!  Of course, that included instruction and demos from Lesley as well as time to enhance/alter some of the pieces used.


Funny story, after deciding on the placement of things, Sue discovered that she was working on a piece of paper that was 2 inches too tall and had to condense everything to fit it in before starting to glue to the foundation!  The video below is the process for gluing everything to the foundation paper.  Then it gets glued to a canvas board, and then finally mounted on a cradle board.  The final mounting for this piece remains on the "to do" list.


Hope you enjoyed our recap of the botanical collage retreat! 

Wednesday, October 13, 2021

Altering Cyanotype Prints

 At the Red Thread Retreat, we enjoyed learning ways to alter our cyanotype images by using different chemicals and techniques. Serendipity is also a big part of the process. Even though you change things up from a traditional blue and white cyanotype print, you never know what you will get when you start adding other components to the experiment.  There is a lot you also don't have control over such as the amount of sunshine, the humidity and the angle of the sun.  You can somewhat control other additives to the botanicals placed in your design.


To end up with the image above, a piece of watercolor paper which had been treated with the Jacquard Cyanotype chemicals was used. Once the botanicals were added some turmeric and then Ferrous Sulfate was sprinkled around the edges of the plants.  The very interesting results on the left of the paper was from a leaf that had many holes in it having fallen on a gravel parking lot and been run over by cars.  The piece was also lightly misted with a vinegar and water solution.


For an October day we were fortunate to have warm temperatures hoovering in the high 70s to 81 with lots of sunshine so the paper. with plants and chemicals incased under a piece of glass, sat out in the sunshine of the parking area for at least half a day to "cook".


When the botanical materials were removed, the image looked like this but it still needed rinsing off in cool water to remove all the chemicals.  Before rinsing it looked like this:


The development process can still continue for a day or so, the final image looks like this now.  It might get cut up to put into a new collage and likely that geode looking area on the left will be a highlight of a new piece.


Monday, October 11, 2021

Botanical Collage Retreat

Two years ago we signed up for a Red Thread Retreat with Lesley Riley - master of cyanotype printing, modern botanicals, inventor of TAP (Transfer Artist Paper).   We were really excited to learn from her and create a botanical collage.  Then COVID hit, and the May 2020 retreat had to be cancelled.  After several attempts at rescheduling through 2020 and 2021, it was finally scheduled for the end of September.  So last week we spent 4 days immersed in art at the Rhodes Grove Retreat Center in Chambersburg, PA.  


Full disclosure: being fiber artists, we both thought we would be working with fabric in this workshop, and didn't realize till a few weeks before that it would be mostly paper, so what ensued was both of us making some last minute cyanotype prints on paper that we could take with us to the workshop.  Most were done on watercolor paper, some on coffee filters which were ironed flat.


We spent the first 2 days making cyanotype prints and learning to create background papers - "rusted" papers by toning, mineral papers by adding assorted chemicals, and lightening prints in a washing soda solution. Fortunately, the weather cooperated and it was warm and sunny - perfect conditions for cyanotype printing.


These are some of the cyanotypes we both did at the retreat.


Above, Lesley demonstrates how to use the toning solutions which included black tea, an iron solution, and a caustic soda solution.  The papers dipped in these solutions were plain papers, not coated with the cyanotype solution.  Below. are some of Elizabeth's prints "cooking" out in the sun.


Speaking of cooking, the food at the retreat center was delicious!  And abundant!  We ate more than we needed to, but it was all so good!  Kudos to the kitchen staff, they excelled at their job.  All our time was spent in the main building, where we had class in a very large conference room, meals in the basement dining room, and sleeping rooms in the adjacent wing.  It was the perfect set-up.  If your group is ever looking for a location for a retreat, be sure to check out Rhodes Grove.

Stay tuned for more posts sharing our retreat adventures.